Hello World Application
How to Create a Hello World Application
This guide helps you build a simple Hello World Application, where we send a HTTP GET request and receive a Hello World response from the Lolo Application. It helps you understand how you can work with Library Functions, route data between nodes, use state and create your own inline Functions.
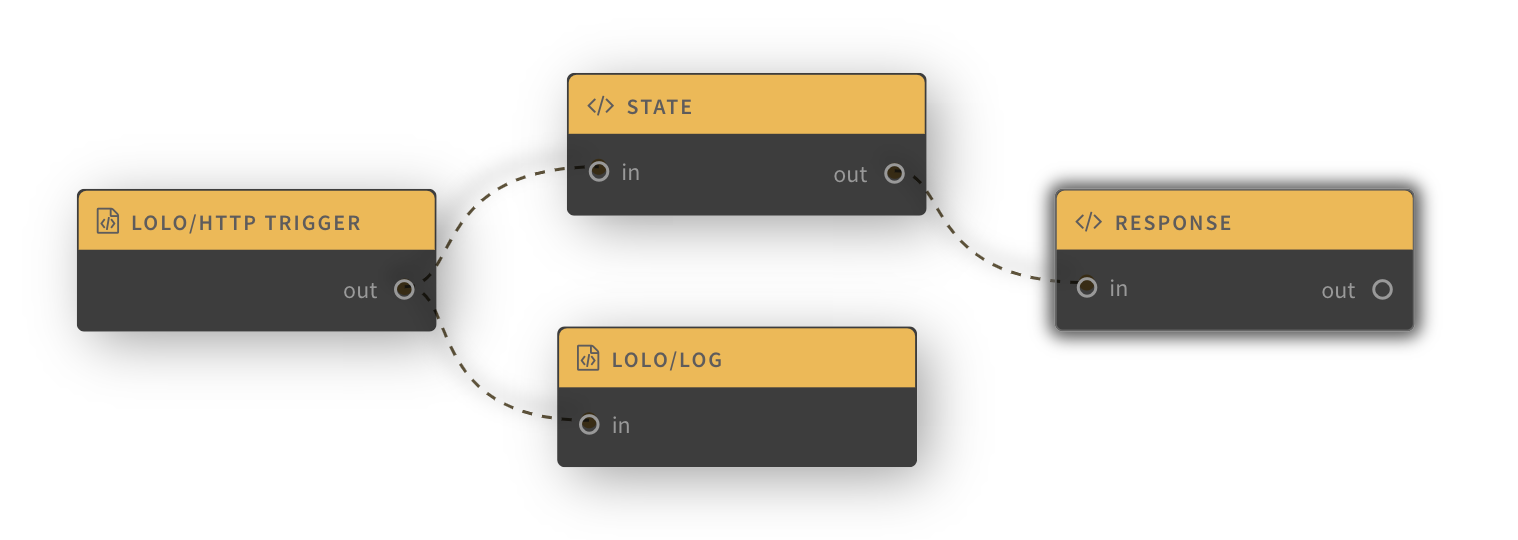
The capabilities and features of Lolo are covered in the most minimal terms here just to get you started.
Create an Application
If you do not have a Lolo account yet. Get a free account here.
When you first log into lolo you will be directed to the Apps page. Go ahead and create a new Application and name it 'Hello World.'
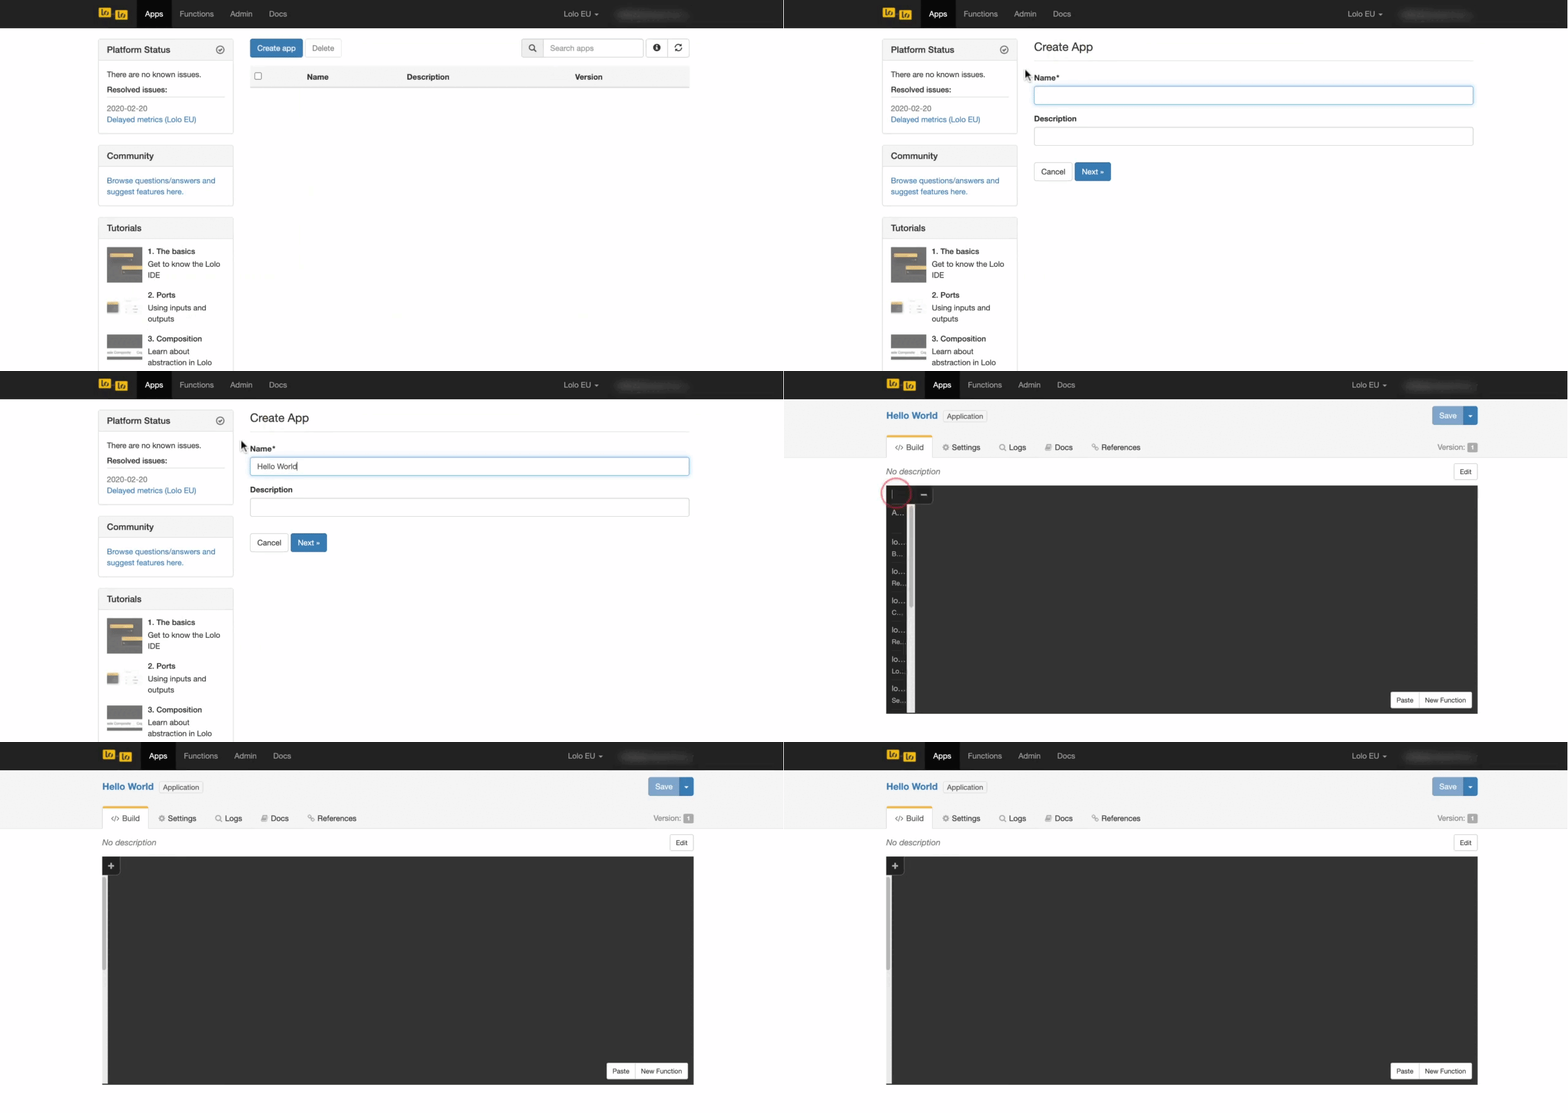
The App canvas has two control sets:
- Function's Gallery accessed by the + in the upper left
- Function Controls in the bottom right
Adding a Trigger
Using the Function Gallery, where we've shared a few Library Functions and Triggers with you that we've already created, add a HTTP Trigger. Double click on the node and write in a path name in the Parameter's tab. The example below is using '/helloworld' but you can write another path name.
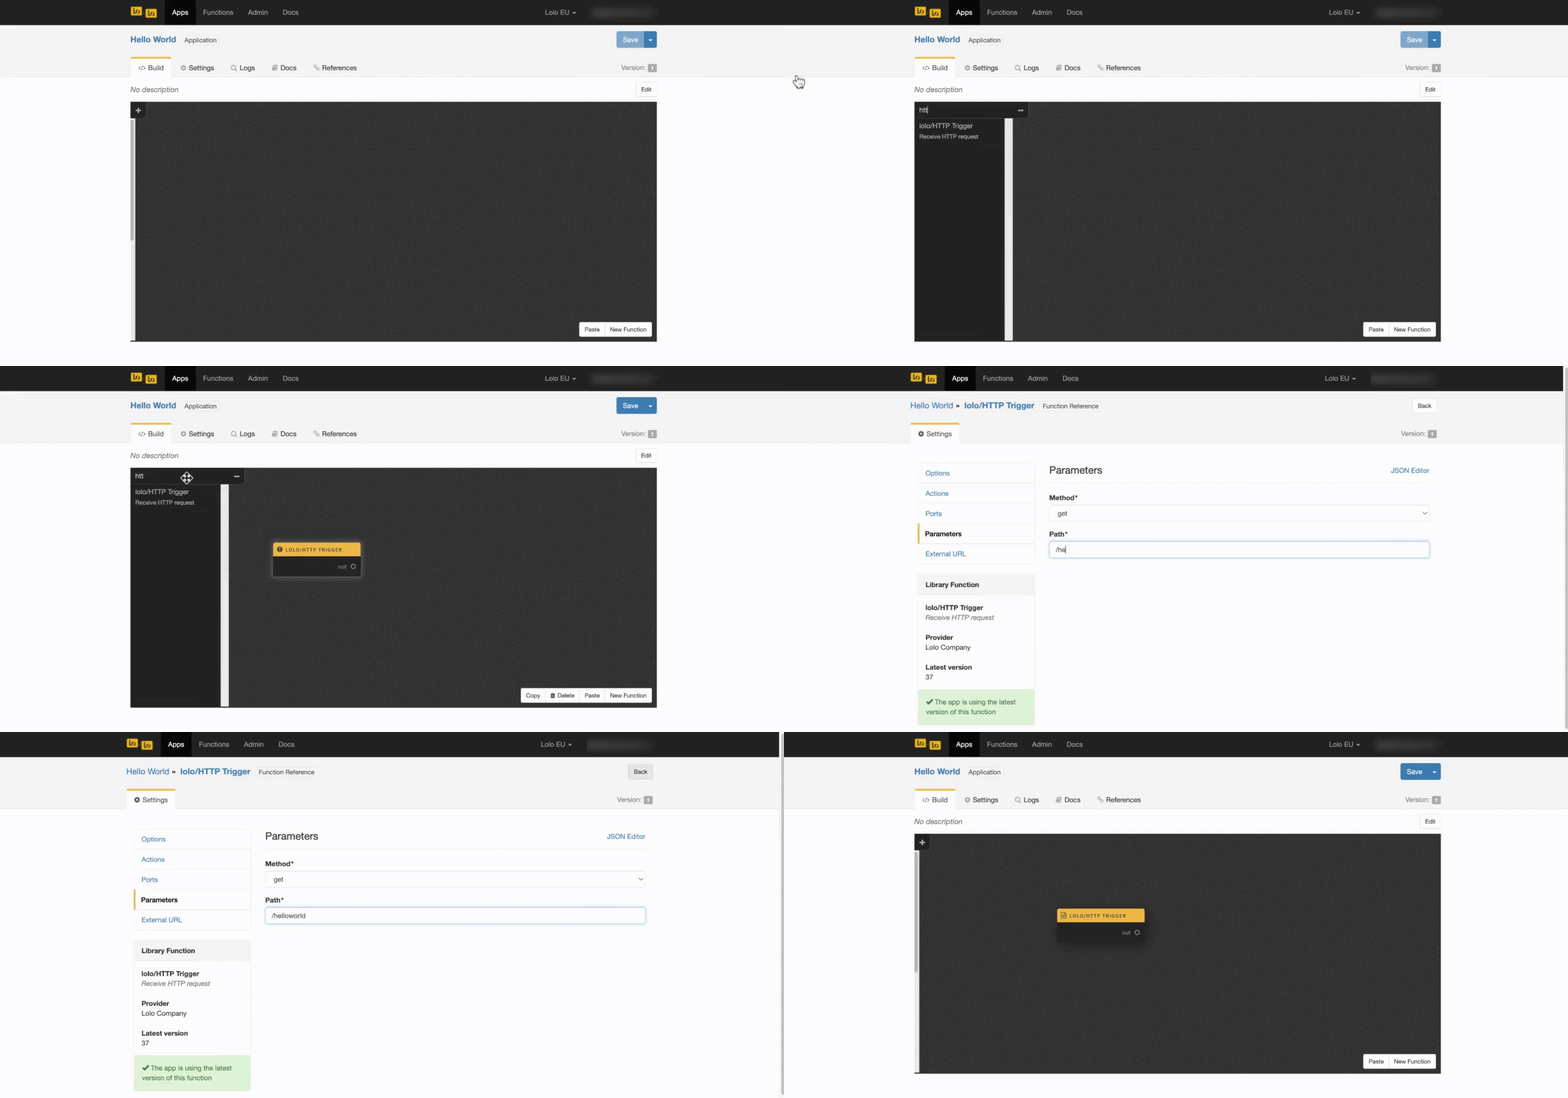
This HTTP trigger has been built by implementing a server which handles HTTPS requests. It helps you build something faster but you can build this on your own. The HTTP trigger also sets up an event listener so we can later on send a response back from another node (i.e. Function). This is not something you need to understand in order to use the HTTP trigger but we cover it under the context (ctx) in later chapters.
Adding a Library Function
Now add another a Library Function from the Function's menu to the left called Lolo/Log.
Route the two nodes together via the 'out' and 'in' ports. This is so the node will fire when the event has been triggered, in this case the HTTP Trigger.
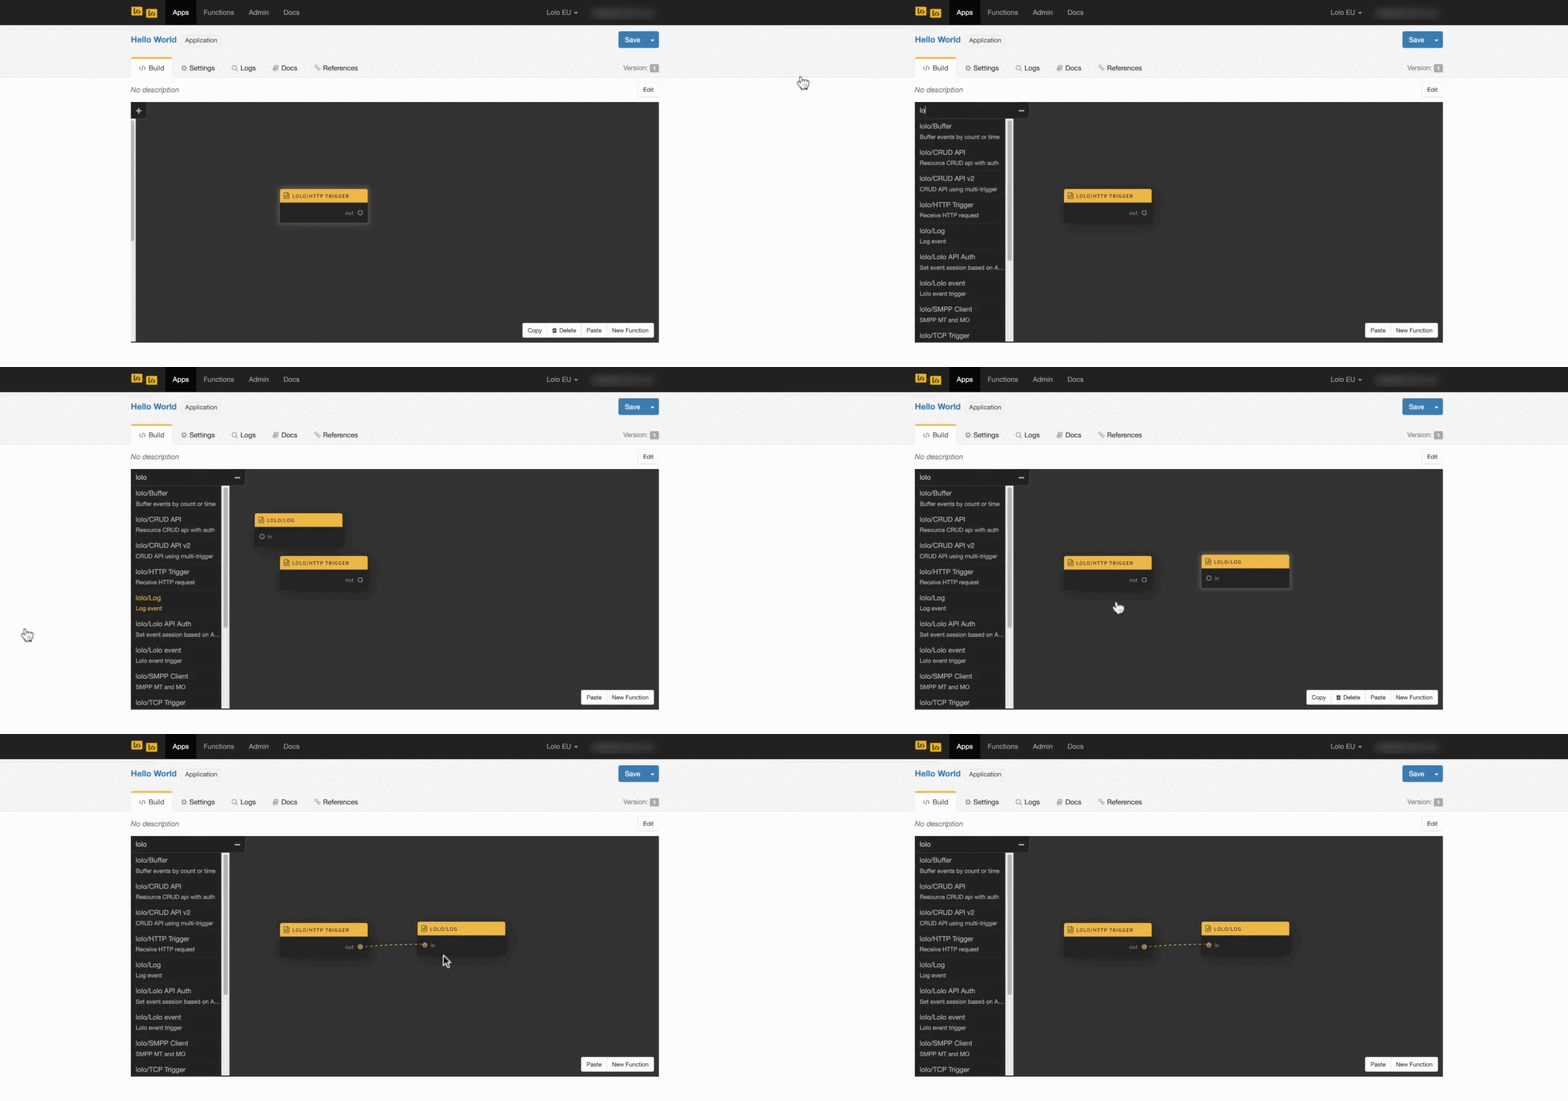
The Lolo/Log Library Function helps us log the event data to the Logs console.
Creating a Function & Using State
Using the Function Controls in the bottom right add a New Function, name the Function 'Using State' and paste in this code into the code editor.
exports.handler = async(ev, ctx) => {
  const { route, state } = ctx;

  // use the Application state with a counter
  let count = state.get('count') || 0;
  count++;
  state.set('count', count);

  // Add the count value to the event object
  ev.counter = count;

  // Reroute the event object to the 'out' port
  route(ev, 'out')

};
Link the HTTP Trigger with the new Function you've created. See the quick demonstration below.
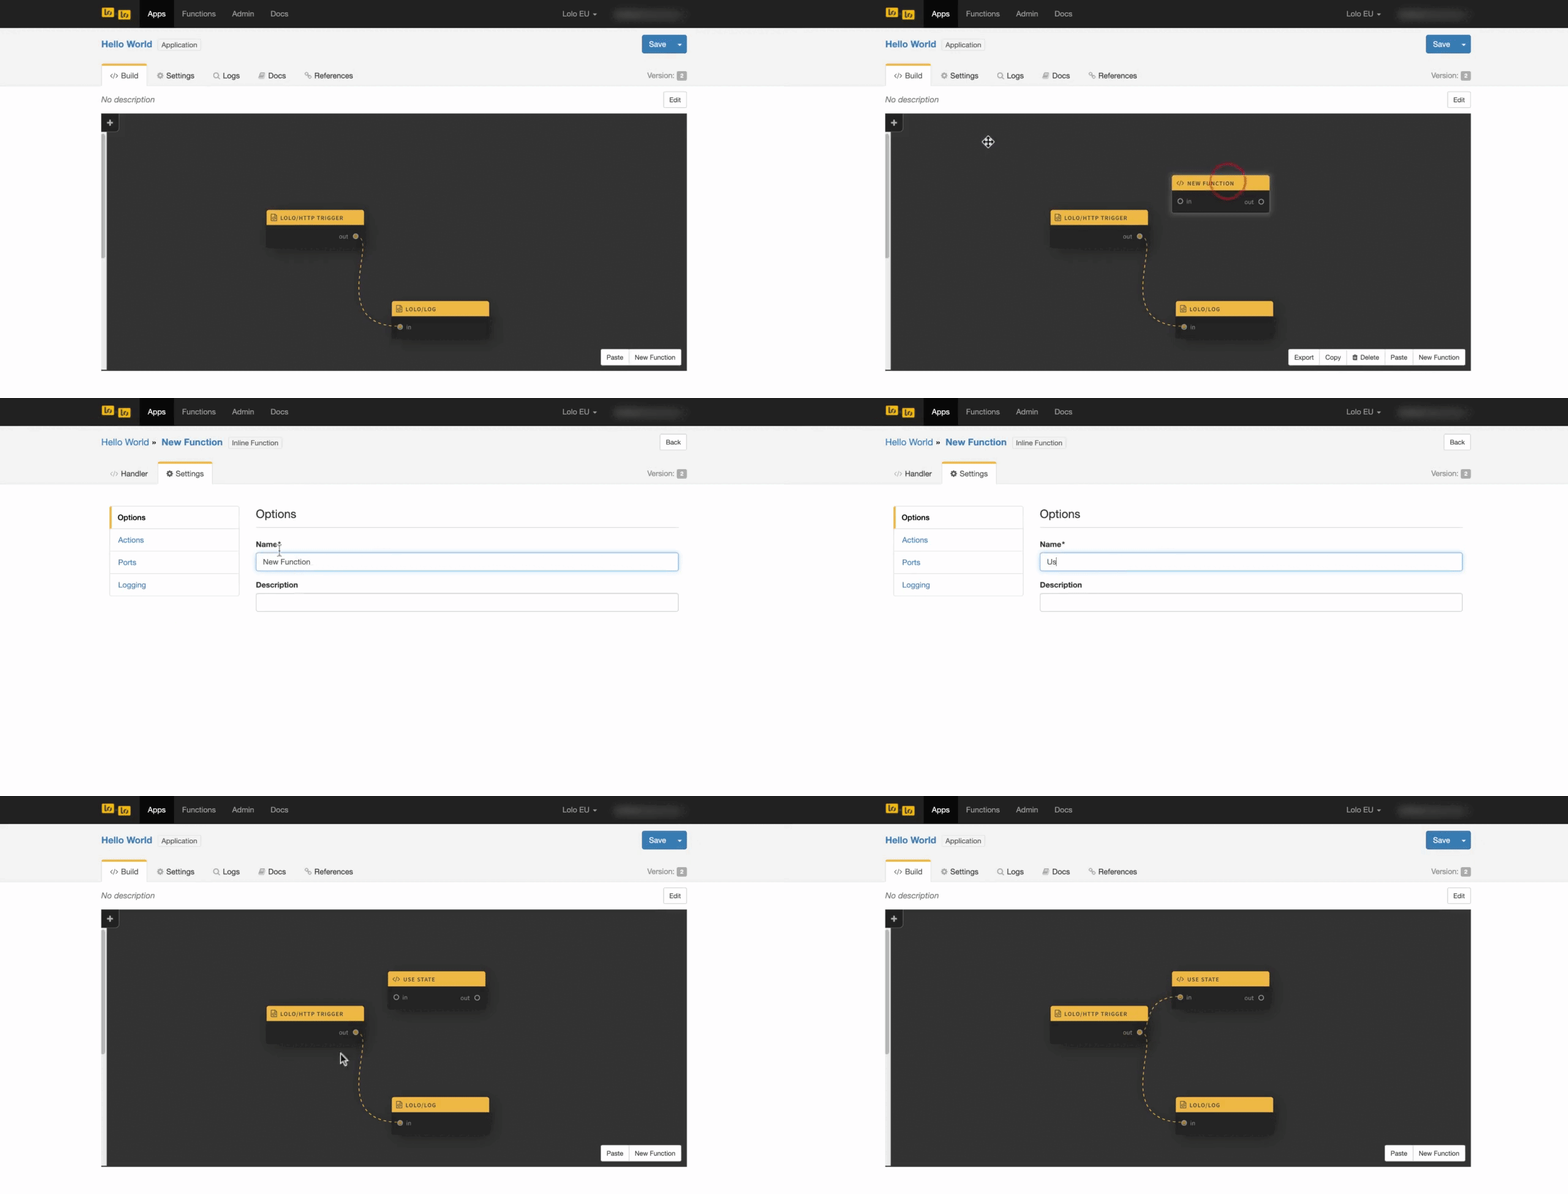
We are demonstrating state here, where the 'count' key and value will be stored within the Application enabling it to be accessed throughout the Application from any Function. You'll understand this once you test this Hello World Application on your own later. If you are interested you can read more on state key/ value store here but it is not essential right now.
Emit a Response
The HTTP Trigger that we are using will be waiting for an event listener to be triggered so it can send back a response to the GET request. I.e. a status code and perhaps a body. Otherwise we'll have a continuously loading request as it won't get resolved. To do this we use something called emit that we extract from the context (ctx). You don't have to understand the context just now to use this.
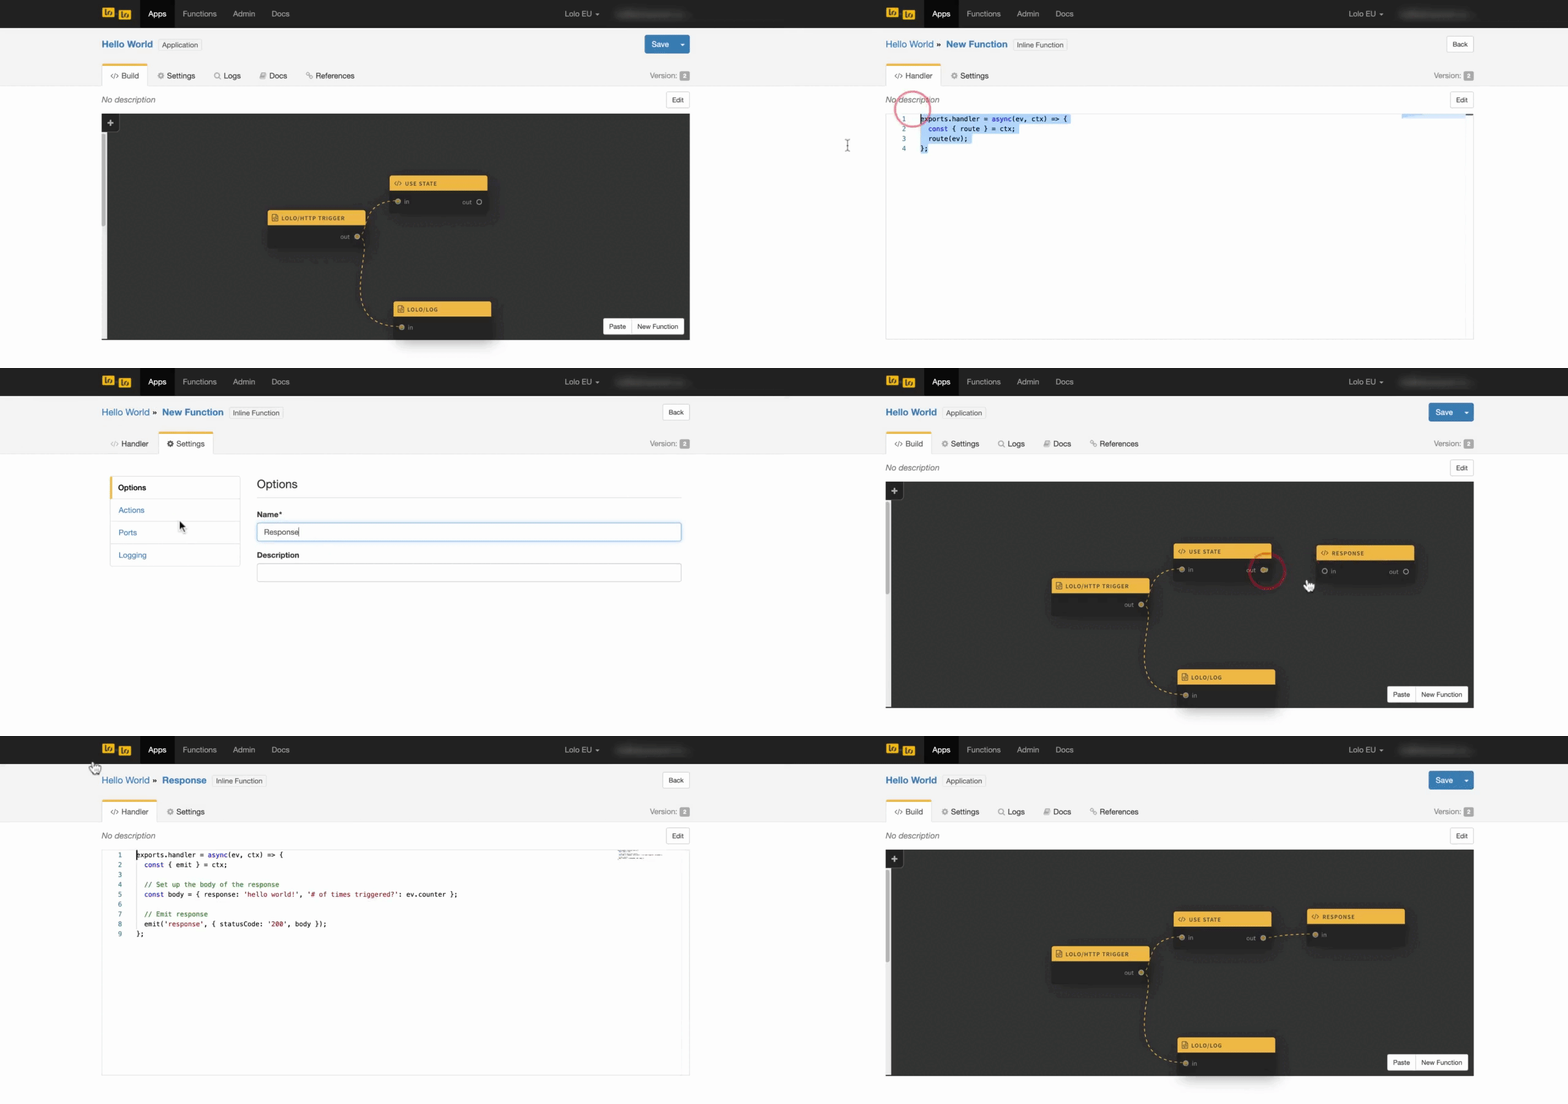
Create another inline Function in the bottom right and name it 'Response.' This is where you will send back a response to the HTTP GET request.
Copy and paste the code below in the code editor of the new Function.
exports.handler = async(ev, ctx) => {
  const { emit } = ctx;

  // Set up the body of the response
  const body = { response: 'hello world!', '# of times triggered?': ev.counter };

  // Emit response
  emit('response', { statusCode: '200', body });
};
Link the new node (i.e. Function) called 'Response' with the 'Use State' Function. Remove the 'out' port in the Ports tab of the Function, as we don't need it.
If you want to read more about Ports and how you can use them in more detail, go here.
Deploy the Application
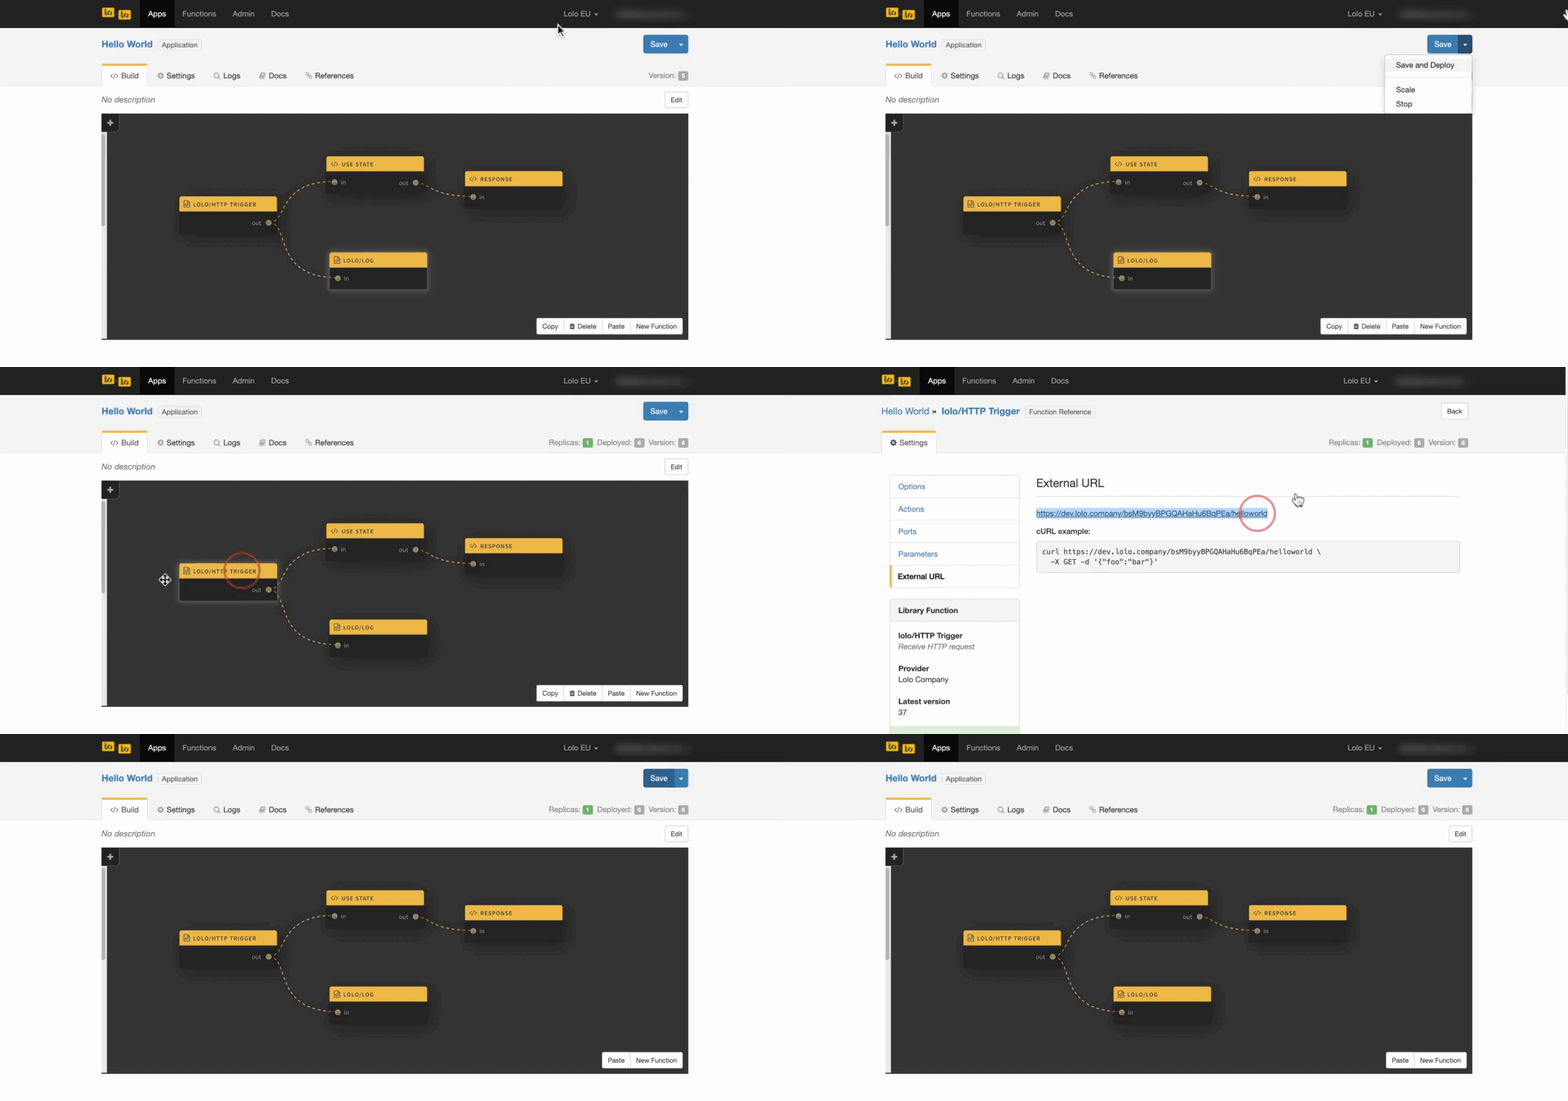
Now you can save and deploy your Application by clicking "Save and Deploy" in the top right dropdown under 'Save'. To trigger this Application you will have to go into the HTTP Trigger by clicking the node, navigating to the External URL tab and grabbing the URL.
You will have to use something to send the HTTP GET Request. Here we are using Postman. You should see the '# of times triggered?' in the response increase with every GET request you send.
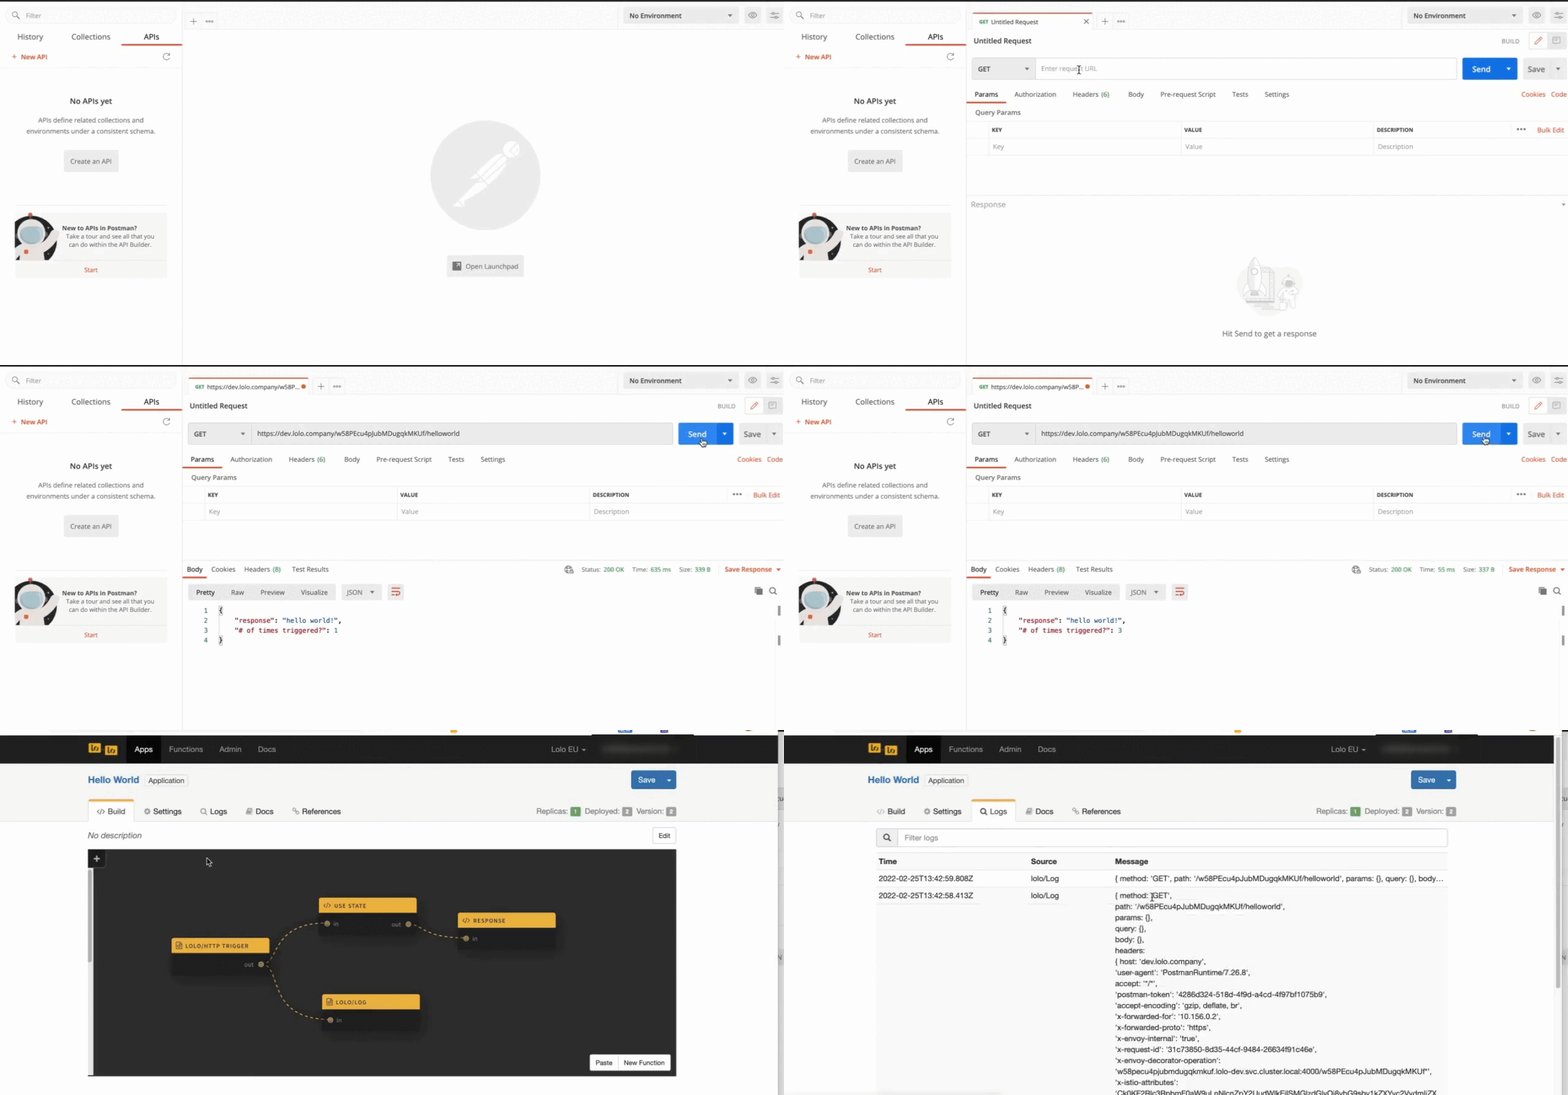
This is then a demonstration of how state works within the Application. That is, you can access values stored within the Application on subsequent invocations. You don't have to start from a blank slate every time the Application is triggered by an event.
Go back to the Logs in the Lolo Application to see the event being logged in the Logs from the Lolo/Logs function. This event data is useful if you want to understand how to extract certain values from the request to use in your Application later on, such as params.
Youtube video tutorial
If you prefer to follow along a video instead check out the 2 minute video below where we go through the entire Hello World application in one go. Use the code blocks provided above to recreate this on your own.
Adding Lolo Authentication
We can use the Lolo API Auth library function to authenticate Lolo users. To do this, we connect the Lolo API Auth function in between the HTTP Trigger and Use State Function. This will require us to provide a Lolo-Api-Key in header of the request. To get a Lolo API key go to the Admin section of your account.
This allows us to see which users are trying to connect to our endpoint by accessing user data in the event object (ev.session) that is passed on from the library function.
See the quick one minute demo below on how to use an HTTP trigger with Authentication.
Read on about Lolo's authentication here.
Updated 3 months ago
Continue reading about Applications to gain a better insight into how they work or try to build a simple WebSocket Application via our step by step guide.
