Slack Application
Building a Slack App with Lolo
Slack is a great way to learn how to work with event-driven backend applications. We'll be building a HTTP callback that will act as our Webhook and will be triggered by Slack via their Slash Commands. The application will be very simple but help you work with slash commands with Serverless. We'll play ping pong.
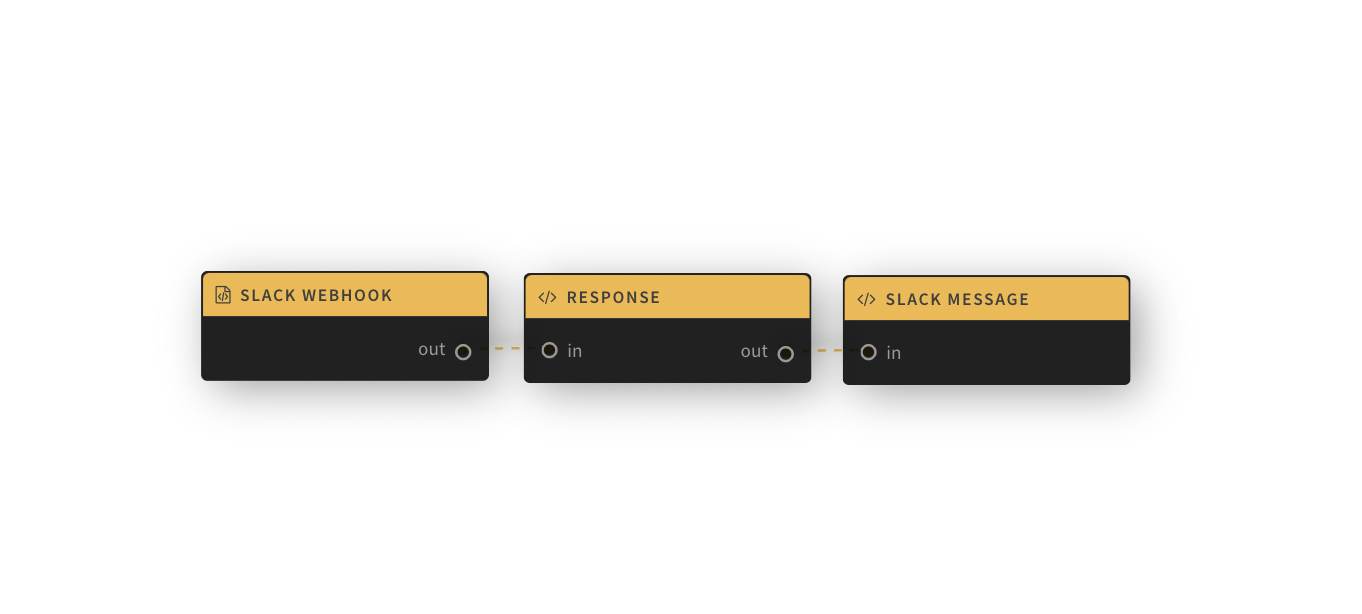
To briefly explain our Lolo workflow, we first create the HTTP trigger which will act as our Webhook and then we'll send back a response with status code of 200 in the Response node. Lastly, we'll send an HTTP post request with the response_url we've extracted from the payload we received from Slack when the HTTP call was made.
This guide is working with Slack Slash Commands, if you want to work with sending information to Slack using Slack's Webhooks see this guide that will let you send a message to Slack every morning with the local weather.
You'll need admin access to a Slack workspace to be able to set up your Slack app and then a free Lolo account.
Setting up your Lolo App & Webhook
We will need a request URL for Slack, so Slack can send us an event when someone uses the slash command. Therefore we'll set up our Lolo app first.
Log into your Lolo account, if you do not have one create a free account here.
Create a new application in Lolo and add a HTTP trigger in the menu palette. Double click it once you have it in your graph so you can configure it.
We'll be setting this as a POST request and the endpoint as /slack via the Parameters tab. You can also rename the node to Slack Webhook but this is optional. Copy the External URL that has been set for you after you've set the path.
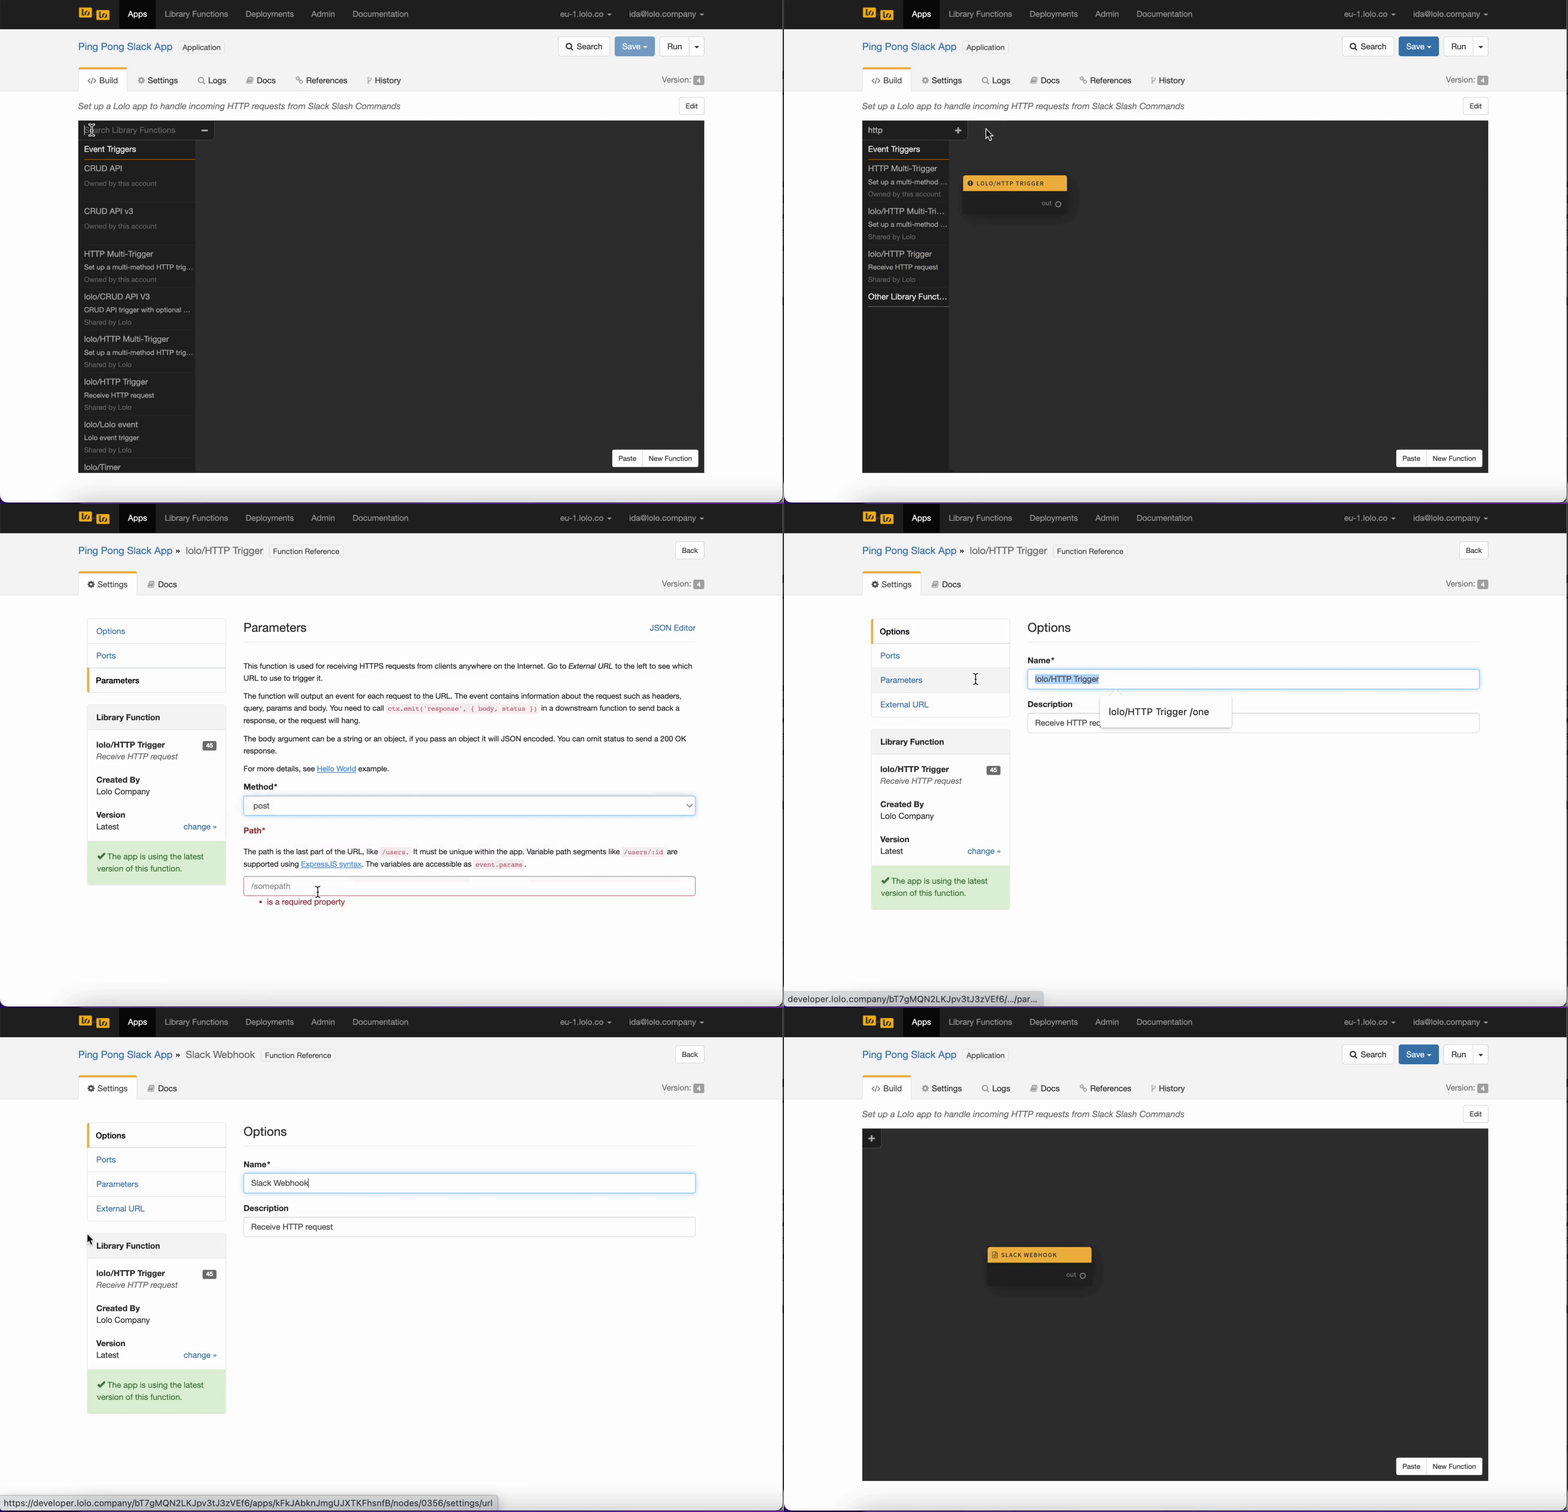
We've now set up our trigger which will trigger this application. You can save your application but no need to run it yet.
Setting up your Slack App
Set up a new app via api.slack.com. You can call it what you'd like. You will need admin access to the Slack workspace that you want to install it for.
After you've created an app, go to Slash Commands where you'll set up a new command. Use your URL that you just copied from your Lolo application.
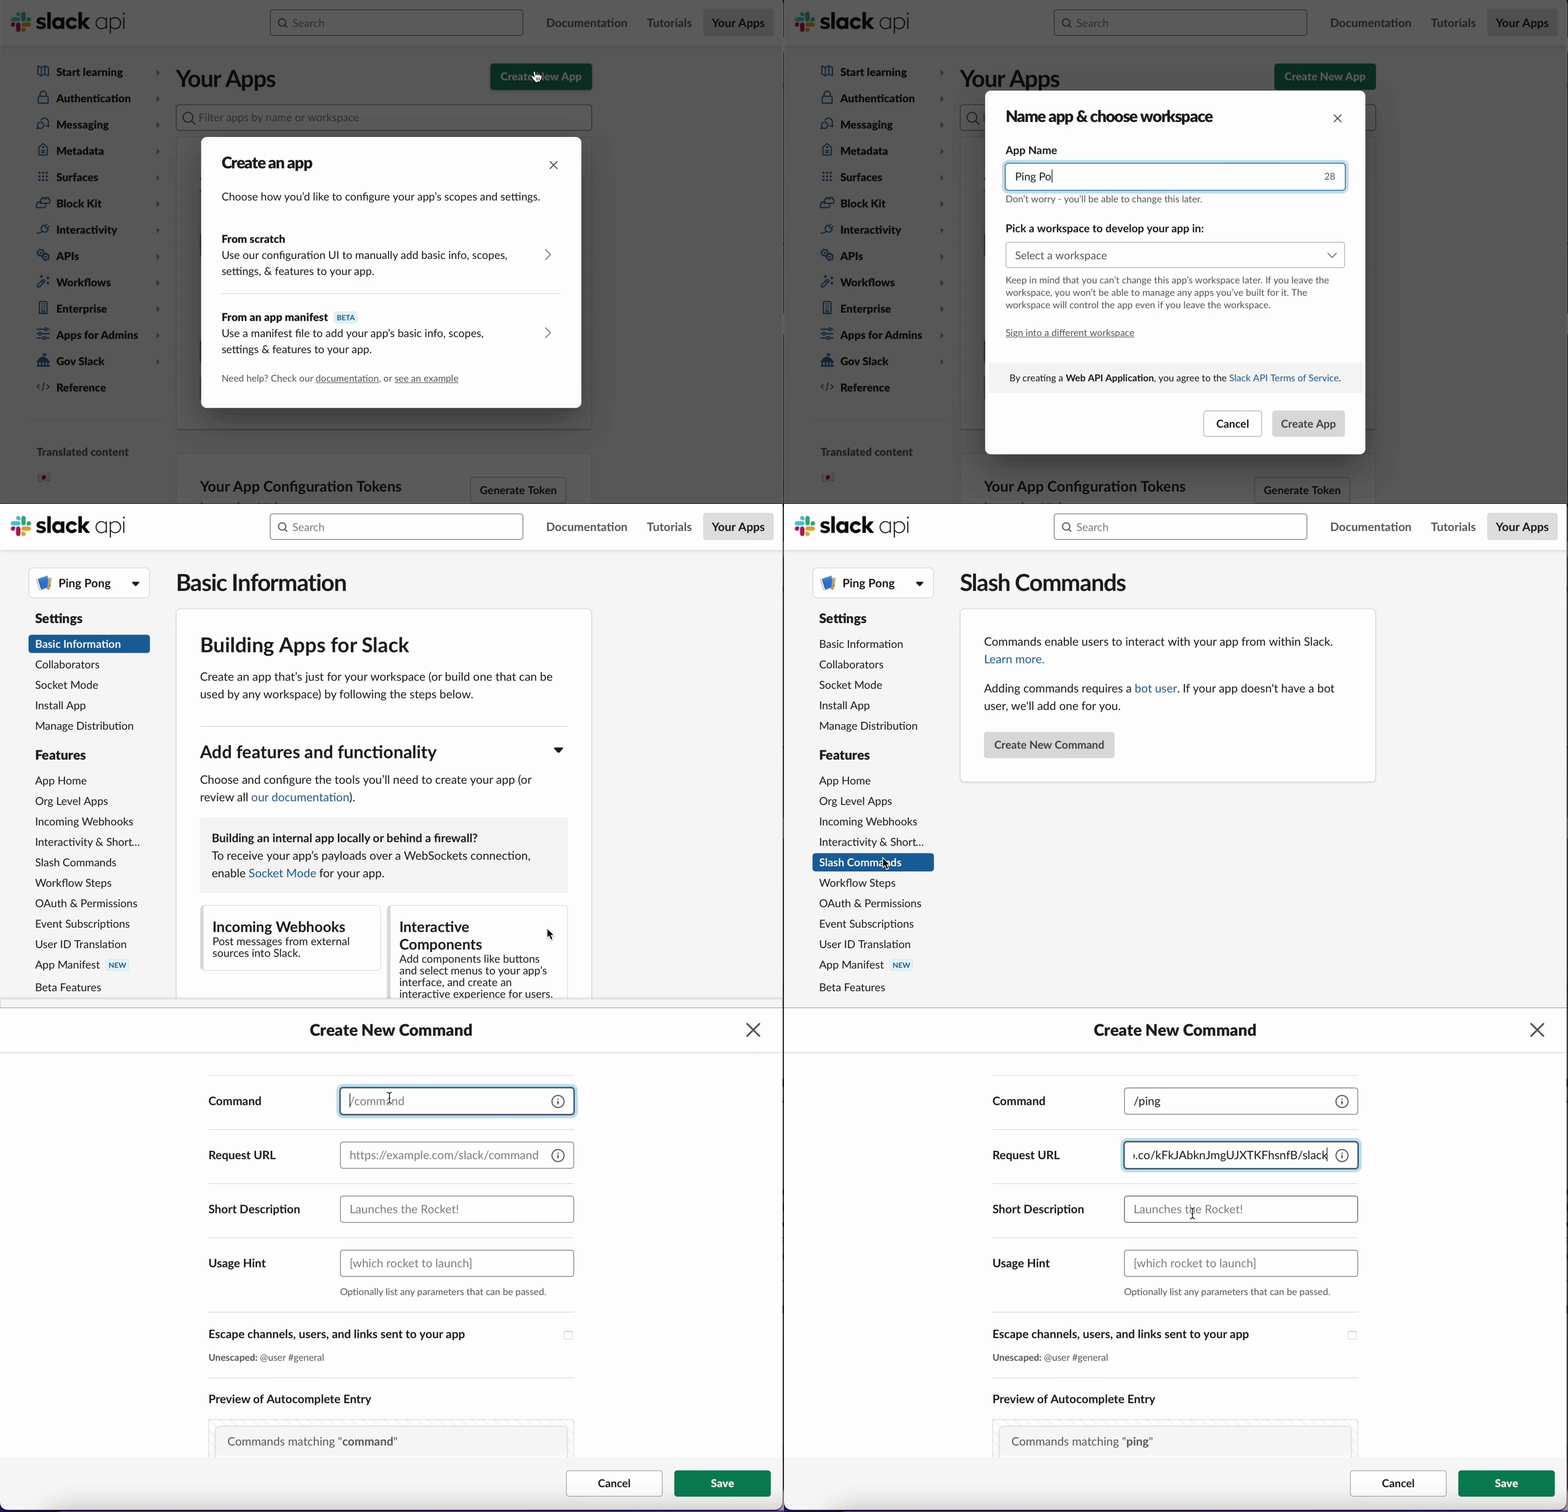
Remember to install the app to your workspace as well. Navigate to Basic Settings for your Slack App to do so.
Responding to the HTTP call
Slack commands will expect a response within 3 seconds so the first thing to do is to emit a response with a 200 status code in the Lolo application when a HTTP call is made to your URL.
Slack will send us data with a payload object we can use to respond. That is, we are not responding directly to the slash command, we are only extracting the response_url so we can send back a response to the message later via a POST request.
Start by creating a new function in your Lolo application and add the code below in its handler.
exports.handler = async(ev, ctx) => {
  const { emit, log, route } = ctx;

  // send back a response to Slack
  emit('response', {statusCode: '200'});

  // Log contents of the payload Slack has sent us
  log.info("slack data: ", ev.body);

  // route the payload data to the next function/node
  route(ev.body);

};
Remember to connect the HTTP trigger with your new function you've created.
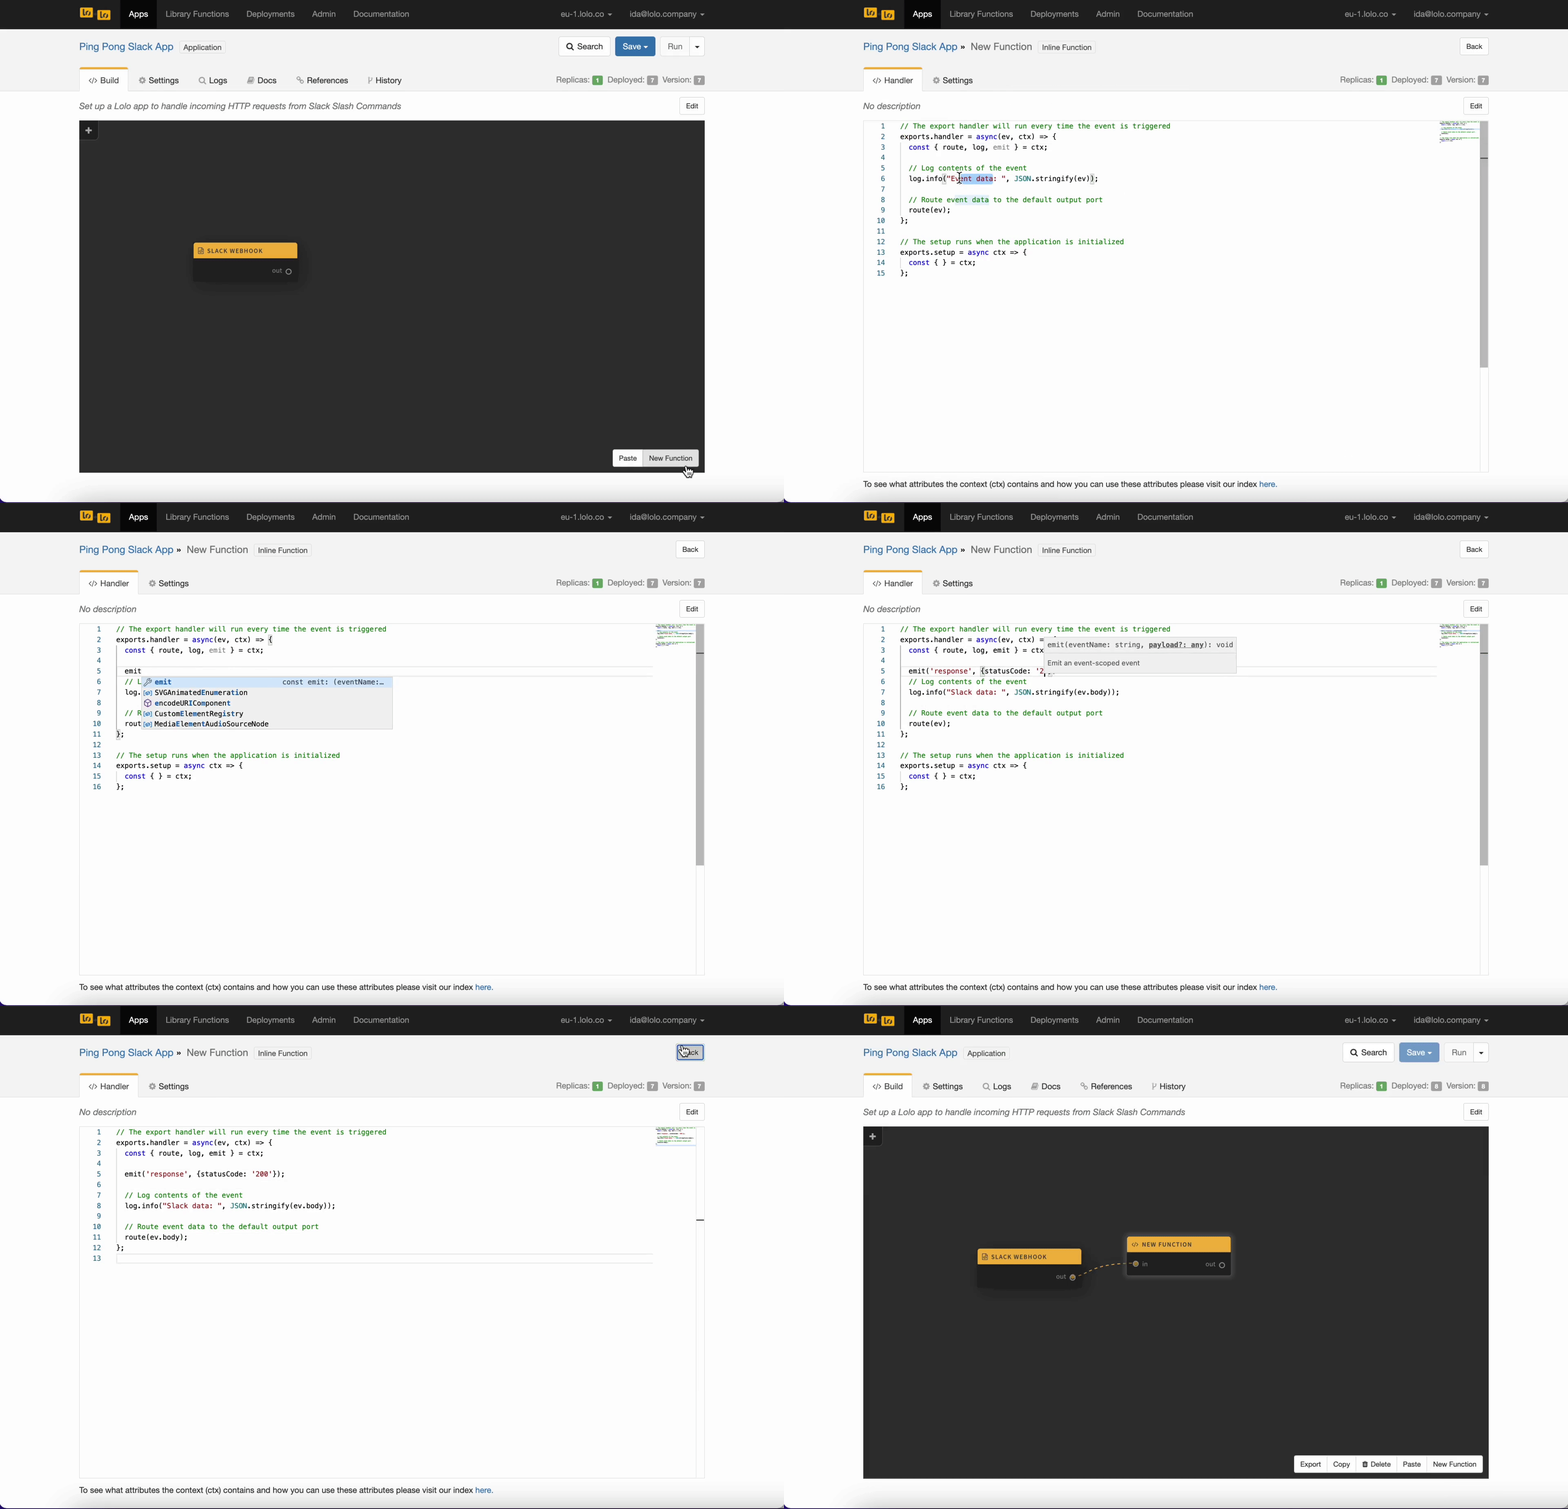
By routing the Slack payload data to the next function, we can extract the response_url within the next node/function. This Slack app is only doing two things so we don't need to extract much here from the payload but when you build richer Slack applications you'll want to extract more information about the command rather than just the response_url.
Save and Run your application.
If you've installed the app to your Slack workspace you can now test out the command you've set up in Slack. It won't give you anything back but as long as it doesn't give you an error you know that it is working.
Navigate to your Logs in your Lolo application to see the payload that Slack has given us back and that we've logged from within our new function.
Send back a Response to Slack
The last thing we need to do is using that response_url to send back an HTTP POST request to Slack with our answer to the command. So we can see the pong response to the /ping command.
Create another new function in your Lolo graph and add the code below.
const Fetch = require("node-fetch");

exports.handler = async (ev, ctx) => {
  const { log } = ctx;
  const responseURL = ev.response_url;

  // our Slack response
  const body = {
    replace_original: "false",
    text: "pong"
  };

  // send back the Slack response
  Fetch(responseURL, {
    method: "post",
    body: JSON.stringify(body),
    headers: {"Content-Type": "application/json"}
  }).catch(err => log.info(err));
};
We also need to add [email protected] as a dependency to be able to use it within our code. Navigate to Modules within the app's Settings in Lolo and simply add it there. It will be installed when you save and run your app.
See the image below on the steps needed to finish this part.
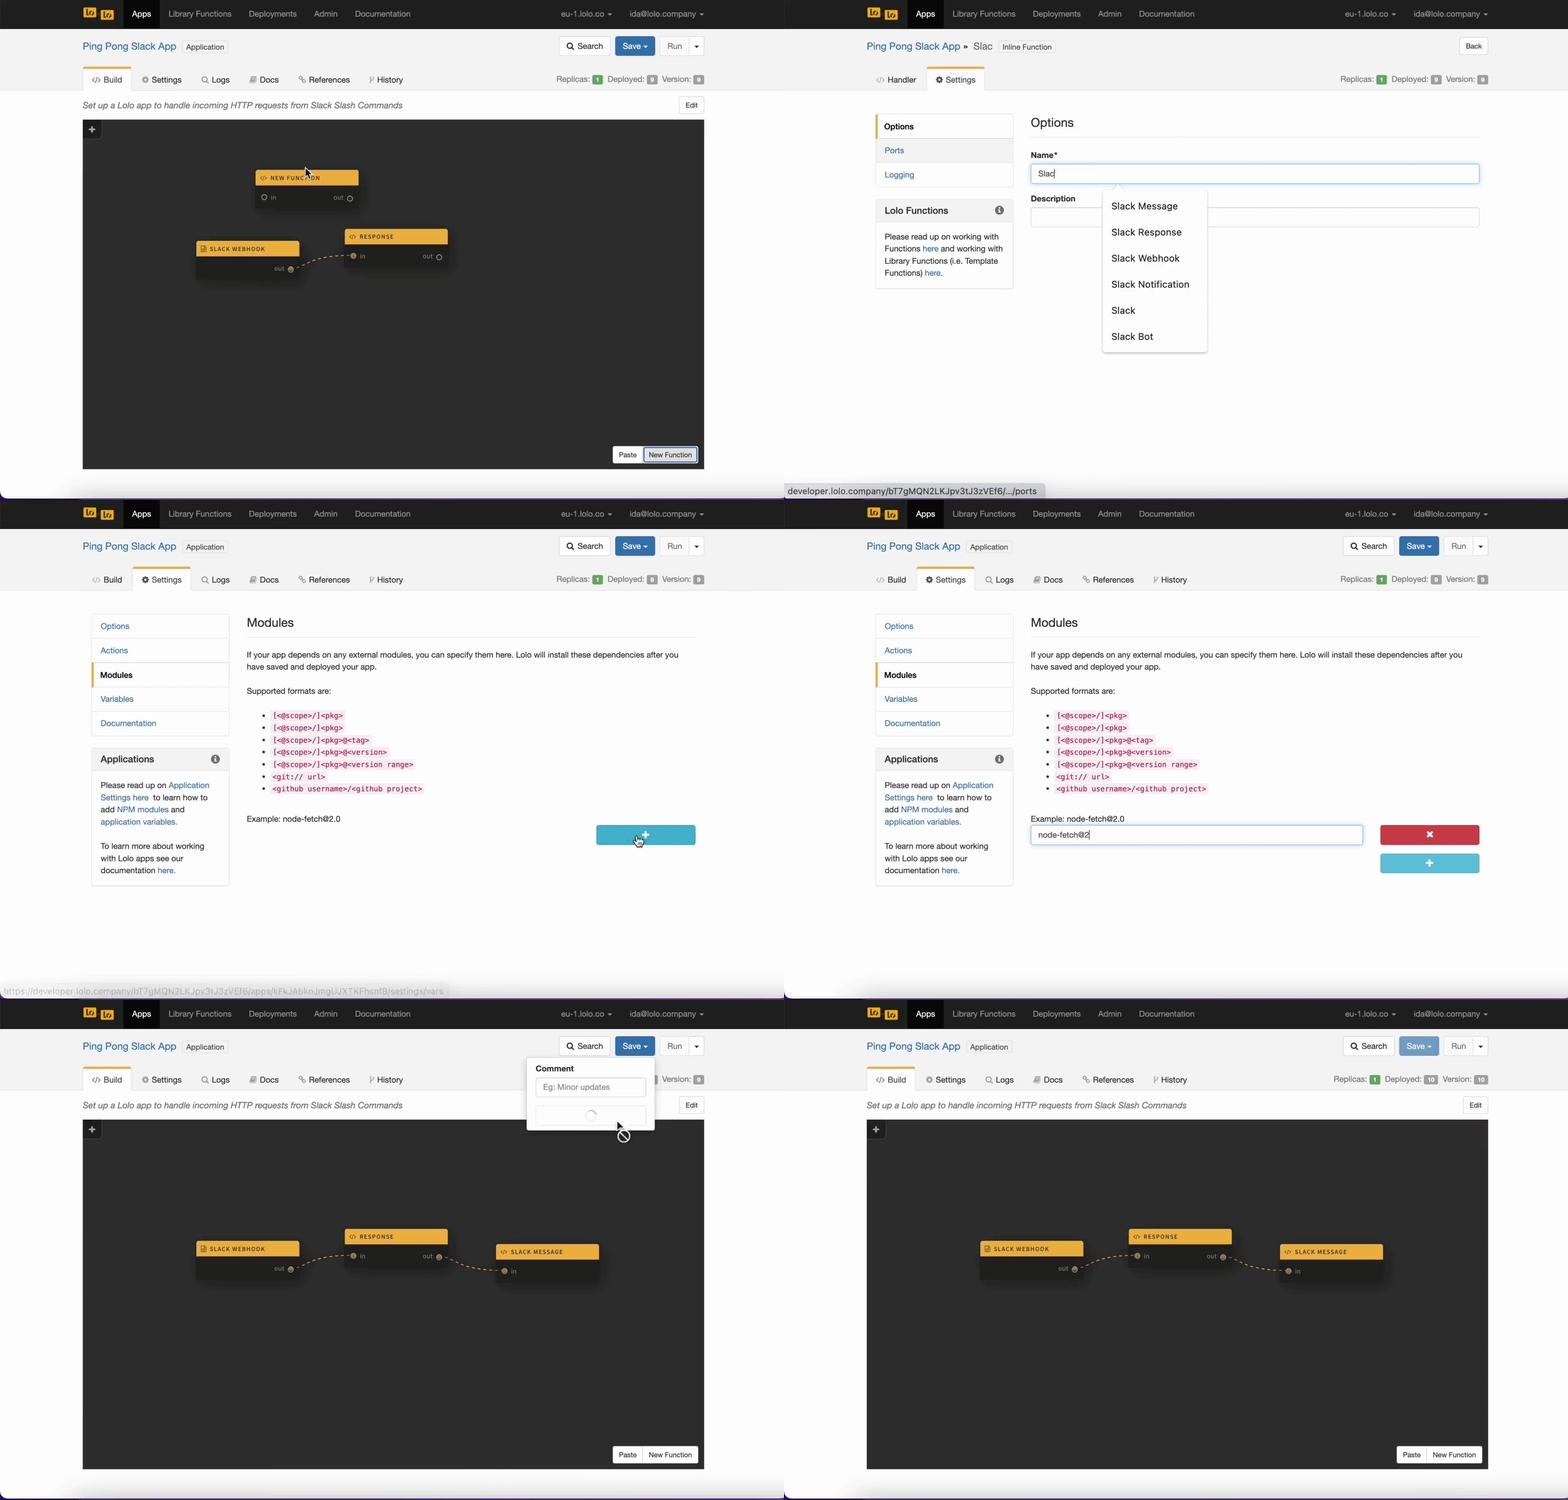
To summarize, if you've added the new function, added the code from above in its handler, added [email protected] in your Modules and connected all your nodes, you can Save and Run your application again.
Be aware that it may take up to one minute to deploy now as we've installed dependencies. Look for Listen to Port 4000 in your Logs to see that it has successfully deployed.
Test your Slack App
Open up your Slack and then try your slash command again. I've set up /ping and my response will be pong. See what this looks like below.
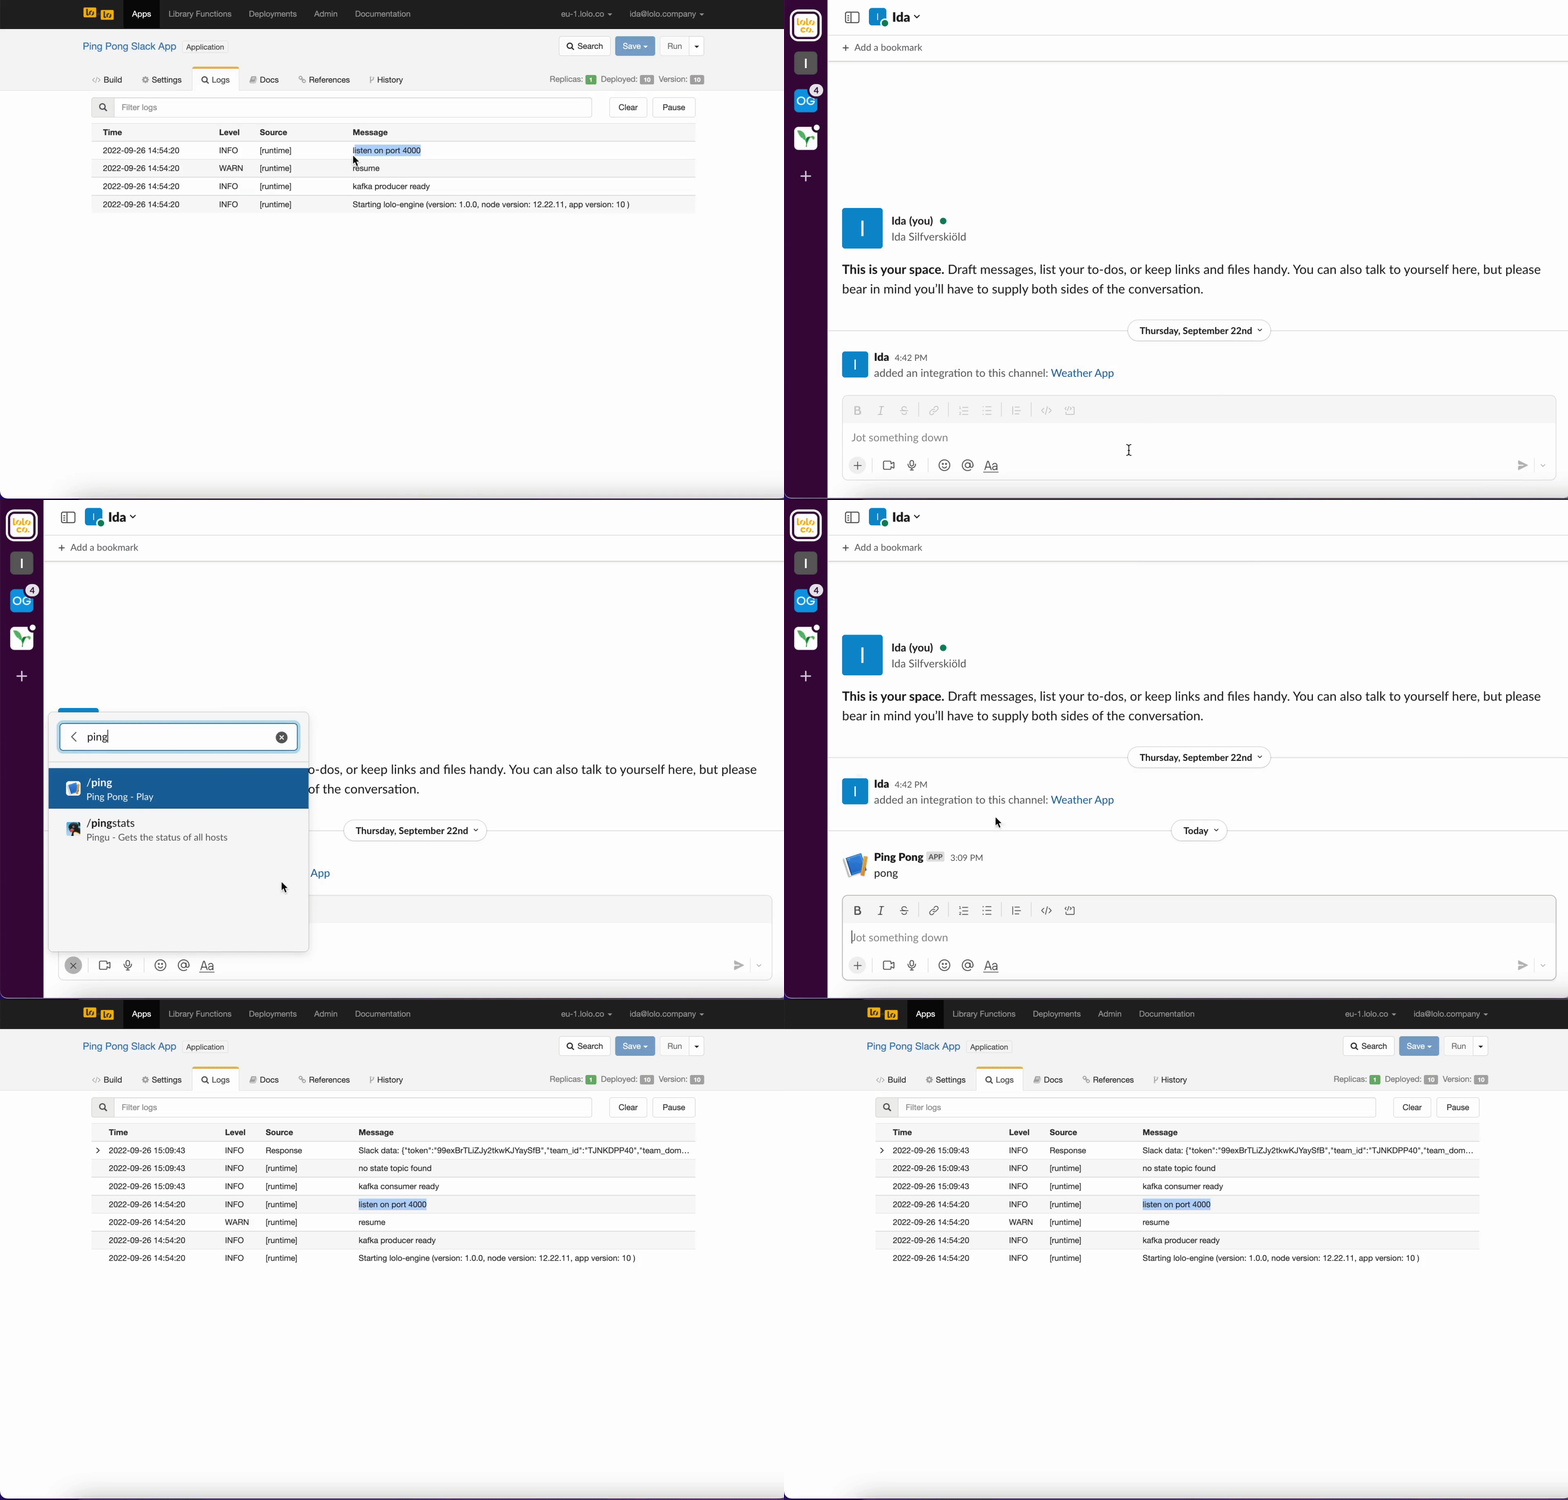
From here you can add to it using Slack actions in your messages and then extracting values from the payload event when the user interacts with it.
Youtube Video Tutorial
If you prefer to follow via a video tutorial check the video below.
Updated 3 months ago
