Custom Trigger with Node-Cron
Create an Application with a Custom Event Trigger
Although Lolo has a lot of library functions to build from, Lolo Code is incredibly flexible so building your own triggers is simple enough.
We'll demonstrate how to produce your own events by using a task scheduler, node-cron, that will run every morning and send you the current weather to your Slack. This will allow you to understand how to produce events, work with engine lifecycle events and add in NPM modules. See our workflow below.
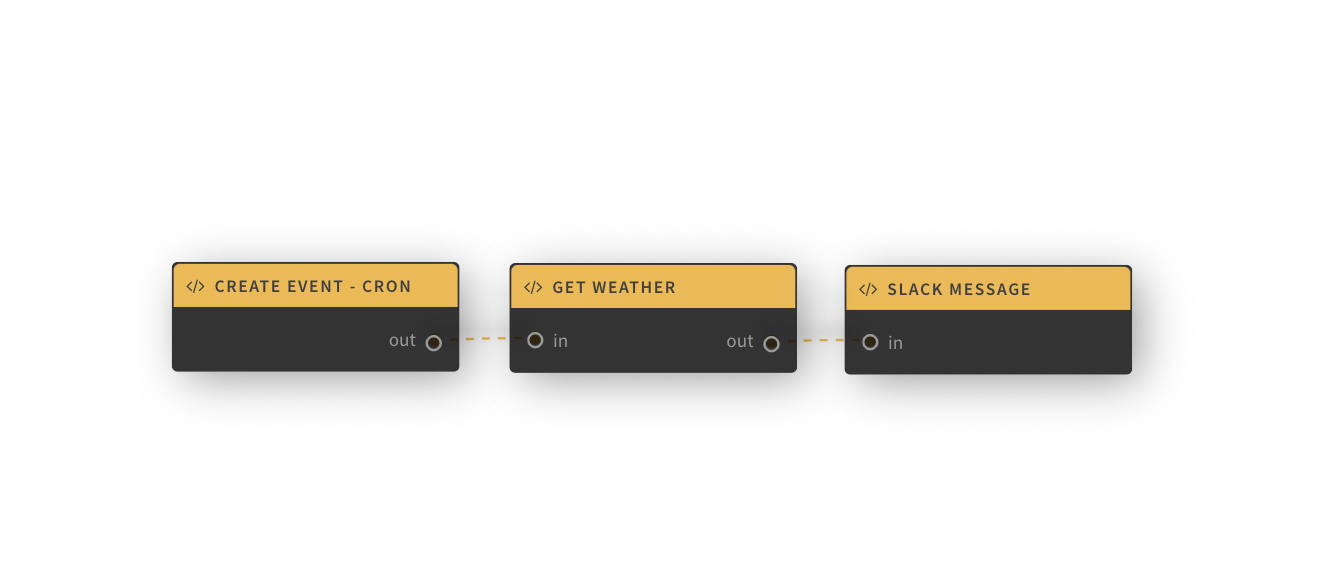
Create the Trigger
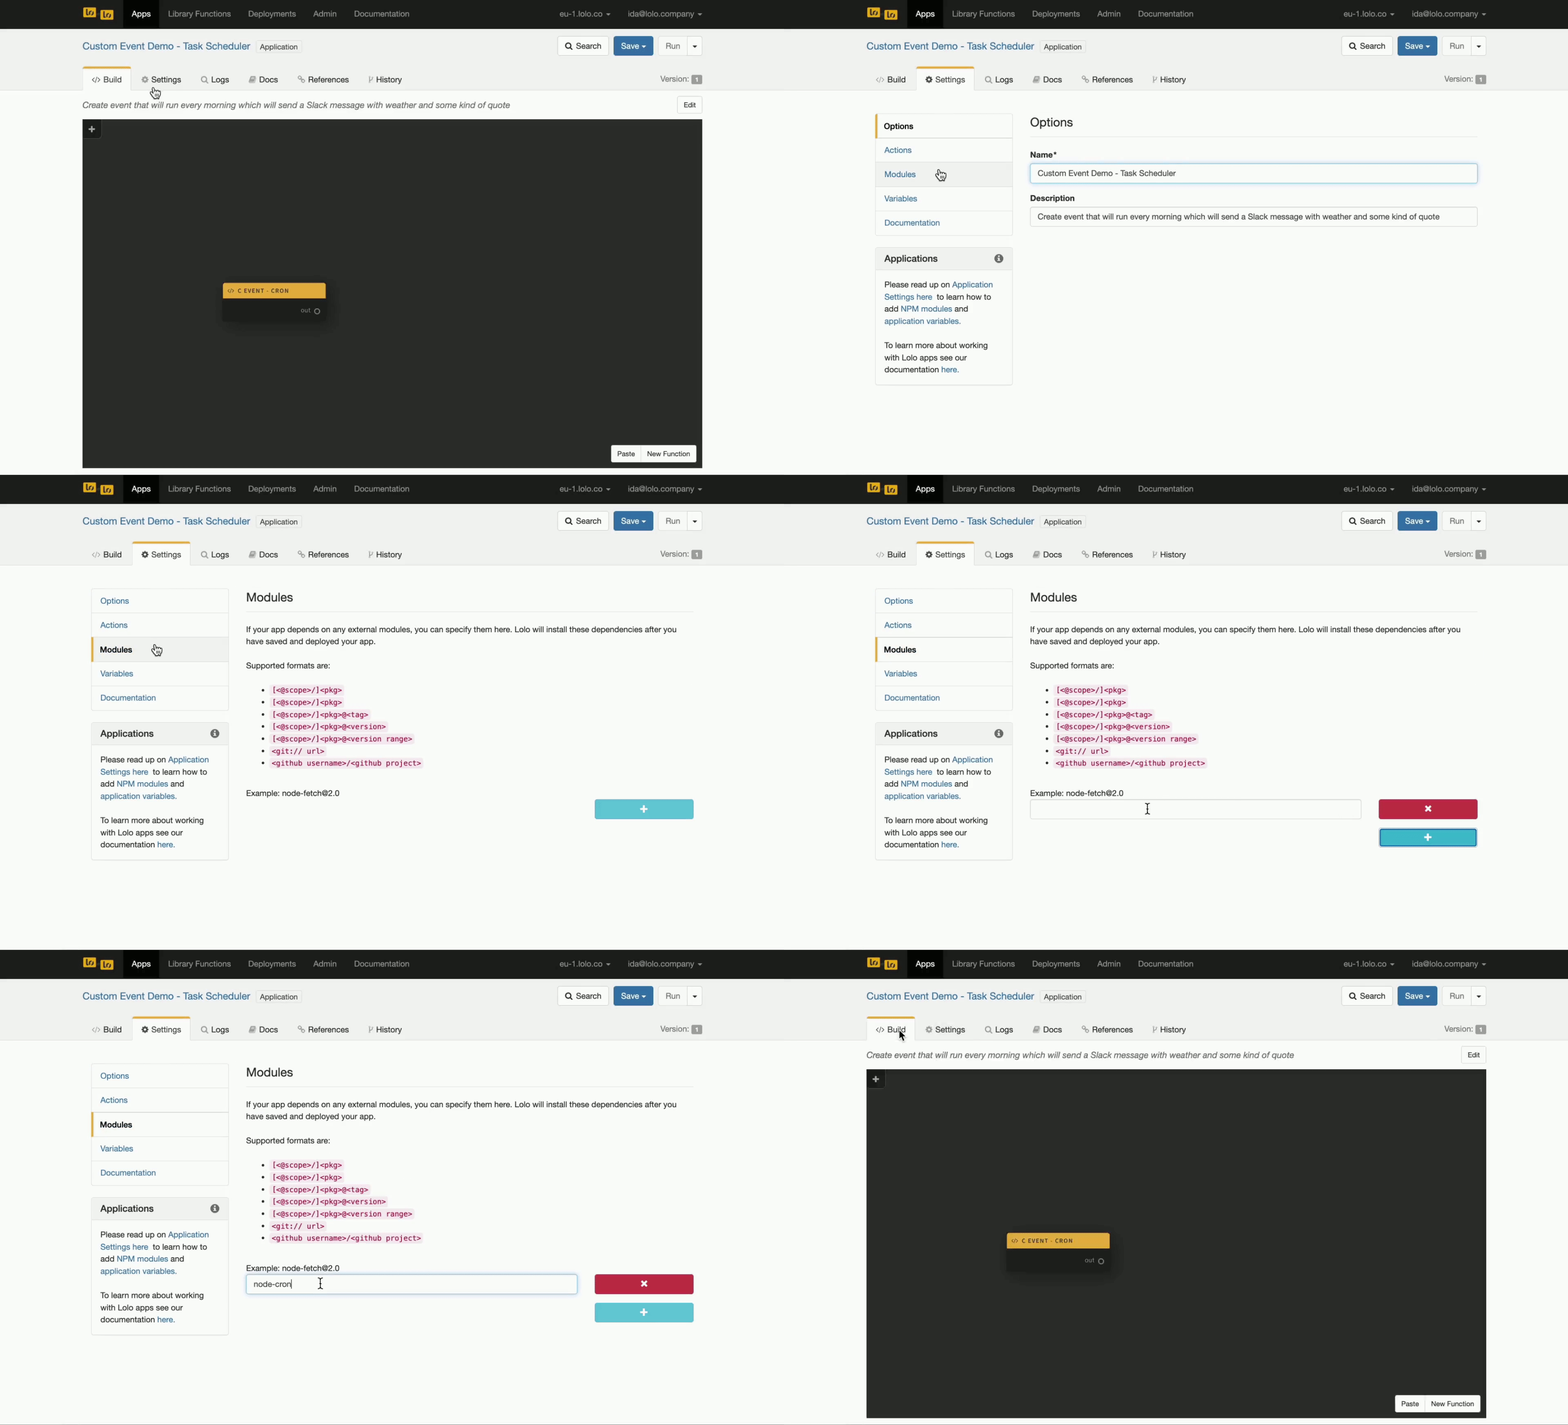
Here we'll be creating a custom trigger so add a new function in the bottom right corner of your graph. You can rename it and remove the input port as well. This will be a trigger so there won't be any data flowing into it.
We need to code a bit here for this so go ahead and look at the code below. This is using node-cron to create events on a schedule. Our cron schedule is every minute here but you may want to change this once you're done testing your events.
const cron = require('node-cron');

// The setup runs when the application is initialized
exports.setup = async ctx => {
  const { produceEvent, events } = ctx;

  const setSchedule = '* * * * *';

  let task;
  events.on('resume', () => {
    task = cron.schedule(setSchedule, () => {
      produceEvent({});
    })
  })
  events.on('pause', () => {
    task.stop();
  })
};


exports.handler = async(ev, ctx) => {
  const { route } = ctx;
  route(ev);
};
We wrap engine lifecycle events around the cron schedule to make sure sure we stop the task on 'pause.' The result could otherwise be slower redeploy times because K8s needs to force-kill the pod after a a timeout.
Remember to add node-cron to your modules so it will be installed. Go to your app's Settings and then navigate to Modules.
Test the Event
Now that we've got our event node set up we need to make sure to do something with it. So create a new function in the bottom right corner of your graph again. We will just test the event by logging something to the console. To do this add in the code below into the new function's handler.
// The export handler will run every time the event is triggered
exports.handler = async(ev, ctx) => {
  const { route, log } = ctx;

  // Log this
  log.info("Event Happened");

  // Route event data to the default output port
  route(ev);
};
To route data between nodes we connect them. Once you've done that, you can then save and run the application.
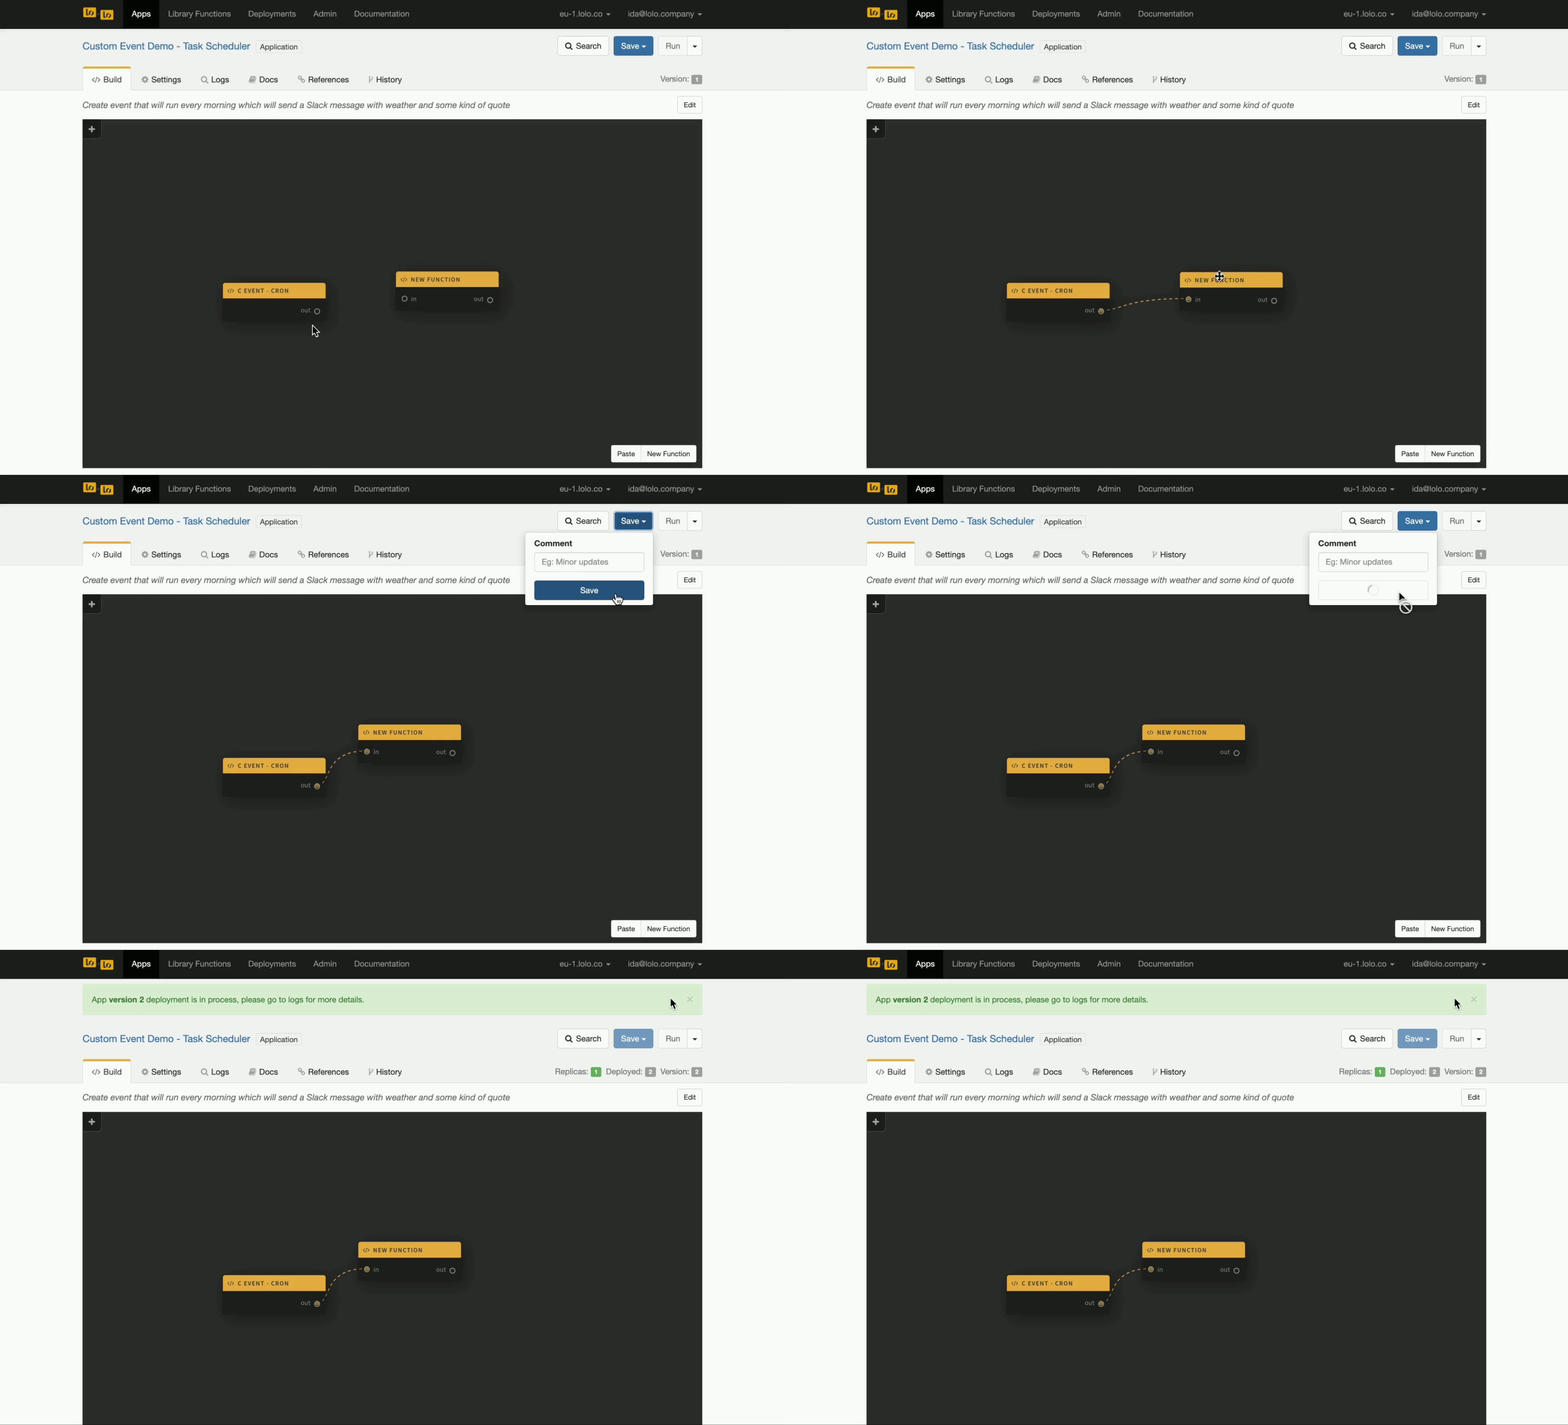
Adding dependencies may slow down deployment time, so this may take up to a minute. You'll see confirmation in the Logs with Listening to Port 4000 if it is successful. Wait until you see this.
It will be a minute to start seeing your events logged to the console after it has been deployed as we've set the cron schedule for every minute. So continue to look into your logs until you see this. Once you see them trickling in you can stop the application if you don't want a continuous stream of "Event Happened" Logs every minute.
At this point you've learned how to create your own event trigger in Lolo. Continue on if you want to see a message in your Slack with weather data whenever the event hits.
Add in Weather Data
We'll be fetching current weather data for Stockholm and then adding it to the event object, so we can use this information in another node.
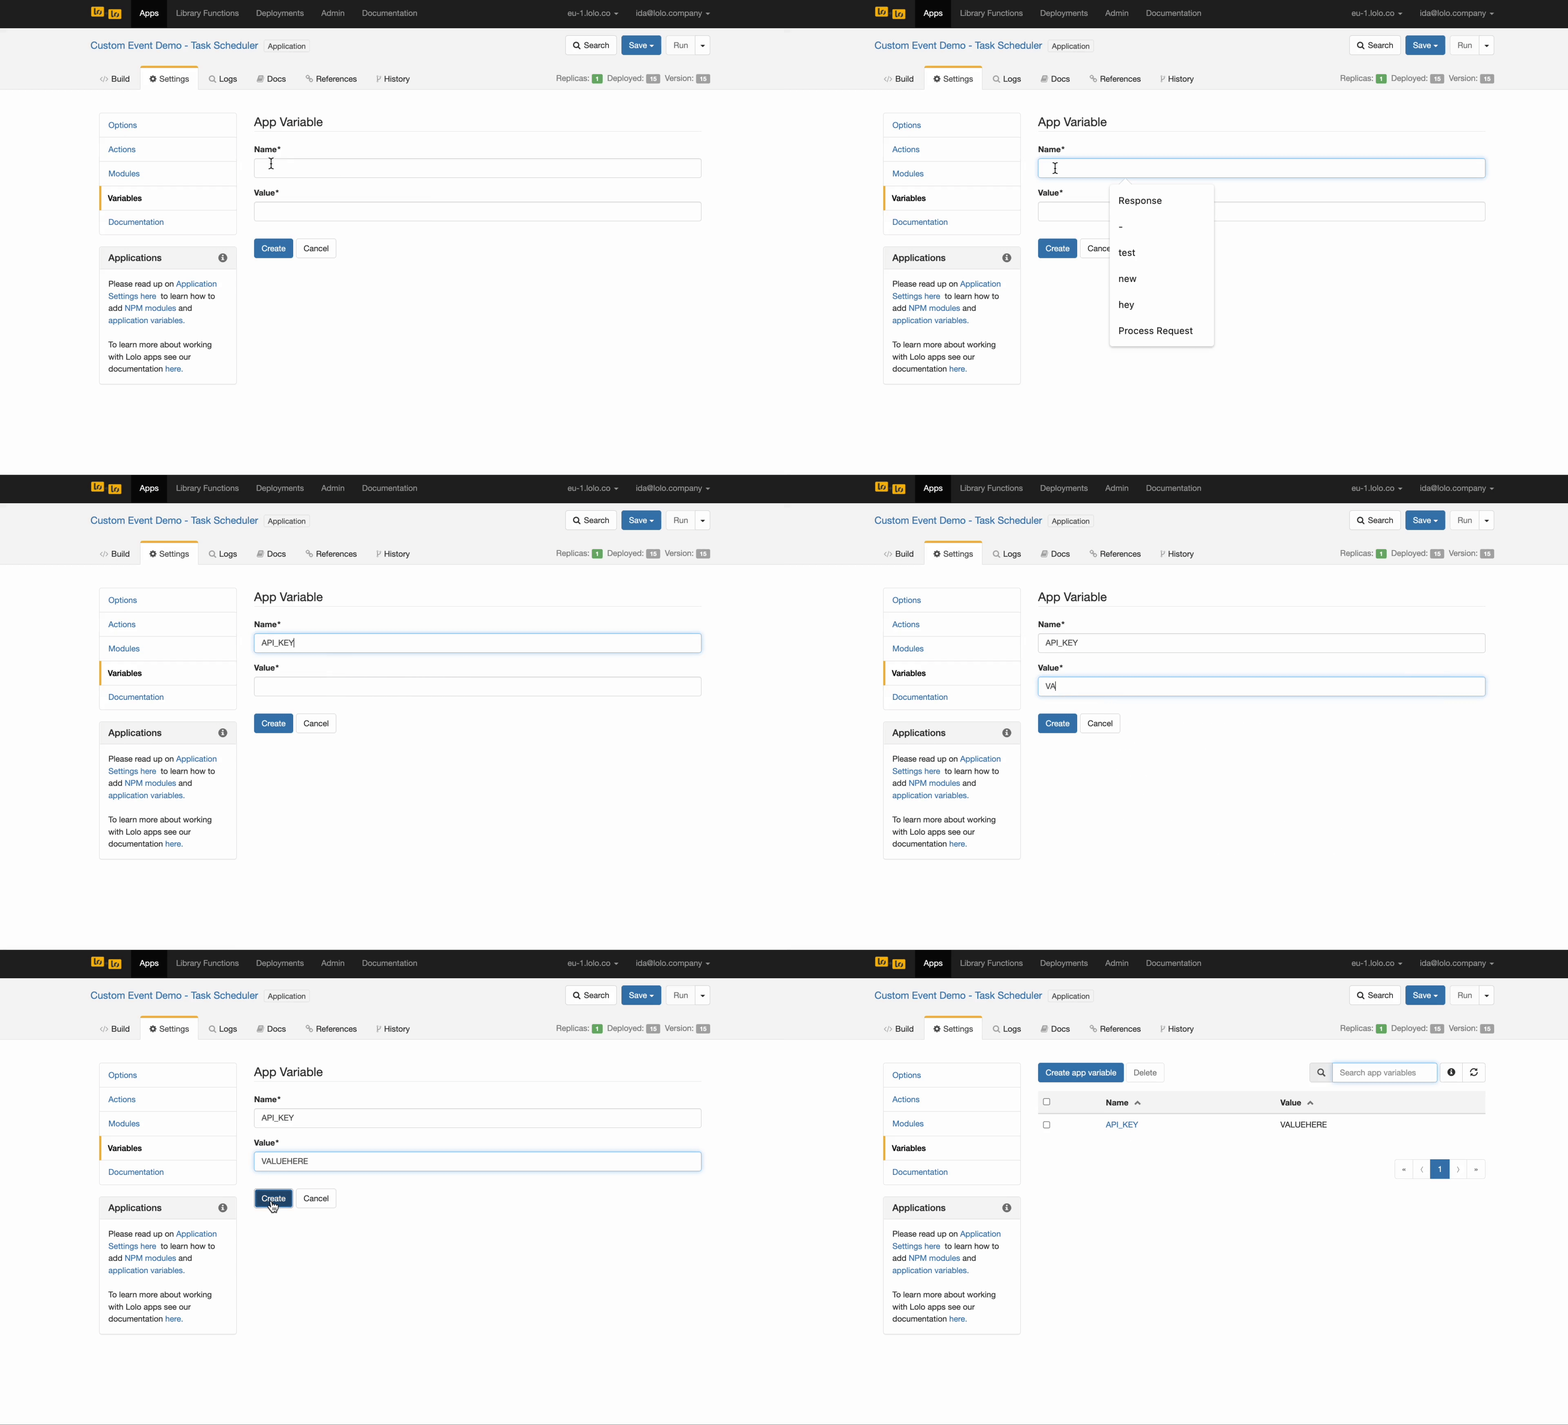
You'll need an API key from Open Weather which is really simple to get by simply signing up. I have added it to Variables within the app Settings.
Open up the new function you've created and rename it to Get Weather Data. Keep both the in port and out port.
Paste in the code below in the function's handler. If you want weather data for another city get those coordinates and exchange them for the ones in this code. This will give you weather data for Stockholm.
const Fetch = require('node-fetch');

exports.handler = async(ev, ctx) => {
  const { route, log } = ctx;
  const { API_KEY } = ctx.env;

  const lat = '59.3326';
  const lon = '18.0649';
  const units = 'metric';

  Fetch(`https://api.openweathermap.org/data/2.5/weather?lat=${lat}&lon=${lon}&units=${units}&appid=${API_KEY}`)
    .then(res => res.json())
    .then(json => {
      ev.weather = json.weather;
      ev.main = json.main;
      route(ev);
    })
};
You will also need to add [email protected] to your Modules within the app's Settings as you did with node-cron. We are using an old version of node-fetch in this code hence the @2.0.
As for explaining what the codes does, we are fetching a json object from the Open Weather API by making a GET request. Then we are adding on the weather array and main object to our event (ev) object. This allows us to access this data in another node as we are re-routing this object via route() by setting it as route(ev).
To test that this is working, create another third function and then do the same thing where you log the event to the console from the other node. This is just to test that you are getting the correct data. Remember to save and deploy again to see your events in the Logs.
Sending a Message to Slack
This last part you'll be sending a message to your Slack whenever the event triggers. To do this you'll have to create a new App in Slack, enable Webhooks and then add a new Webhook where you want your message to show. You can decide to add it to a channel or as a private message. I've integrated the Slack App to my own private messages. Once you are done, copy the Webhook URL as we'll be using it.
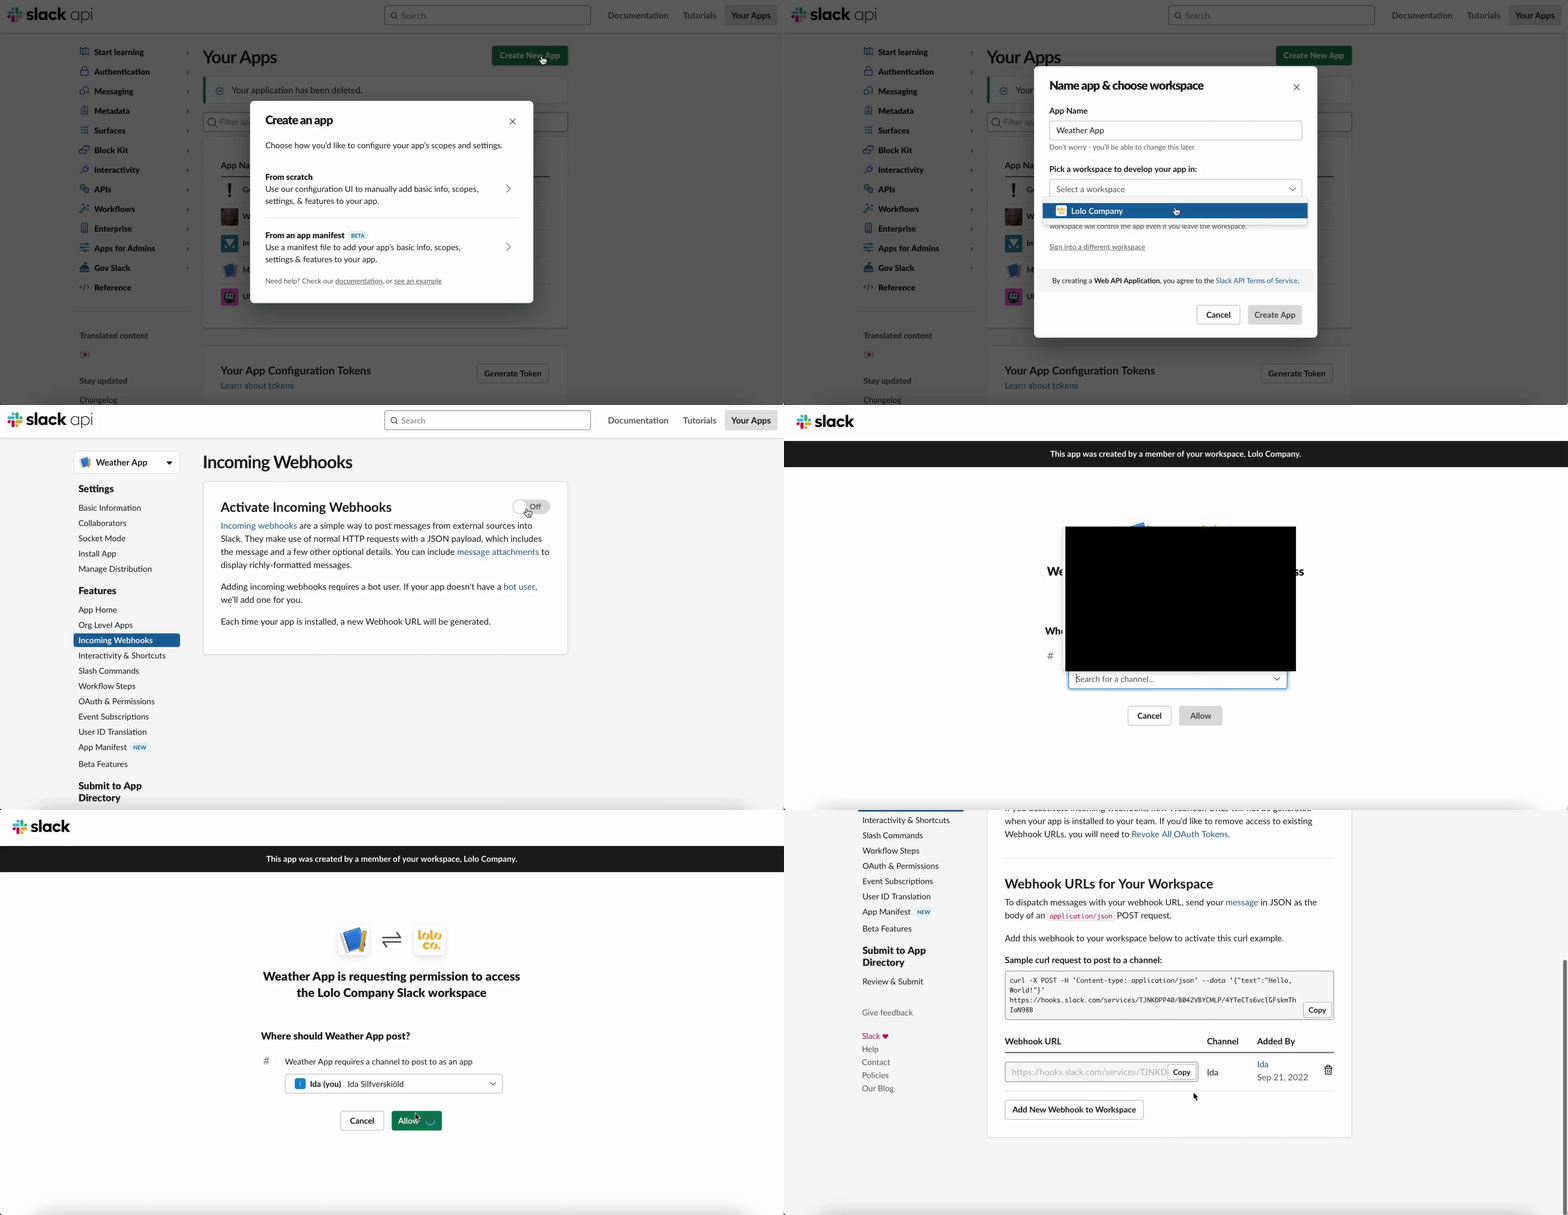
Go back to your Lolo app and then open up your third function to add some code into its handler. You can also rename the function to Slack Message and remove the outport. This is where our workflow will end so we're not re-routing the event data any further.
const Fetch = require('node-fetch');

exports.handler = async(ev, ctx) => {

  const webhookSlack = 'URL HERE';

  Fetch(webhookSlack, {
    method: "post",
    headers: {
      'Accept': 'application/json',
      'Content-Type': 'application/json'
    },
    body: JSON.stringify({
      "blocks": [
        {
          "type": "section",
          "text": {
            "type": "mrkdwn",
            "text": `Good morning Ida! Stockholm has ${ev.weather[0].description} with a temp of ${ev.main.temp}.`
          }
        }
      ]
    })
  })
};
We are simply sending a POST request following Slack's own documentation. The body has been built with Slack Block Kit Builder and we are using the Webhook URL that Slack has provided us with.
Once you've finished you can go back to the graph. Save and Run your application. You may have to wait a bit here as well. Go to your Slack and then wait for your messages to start appearing.
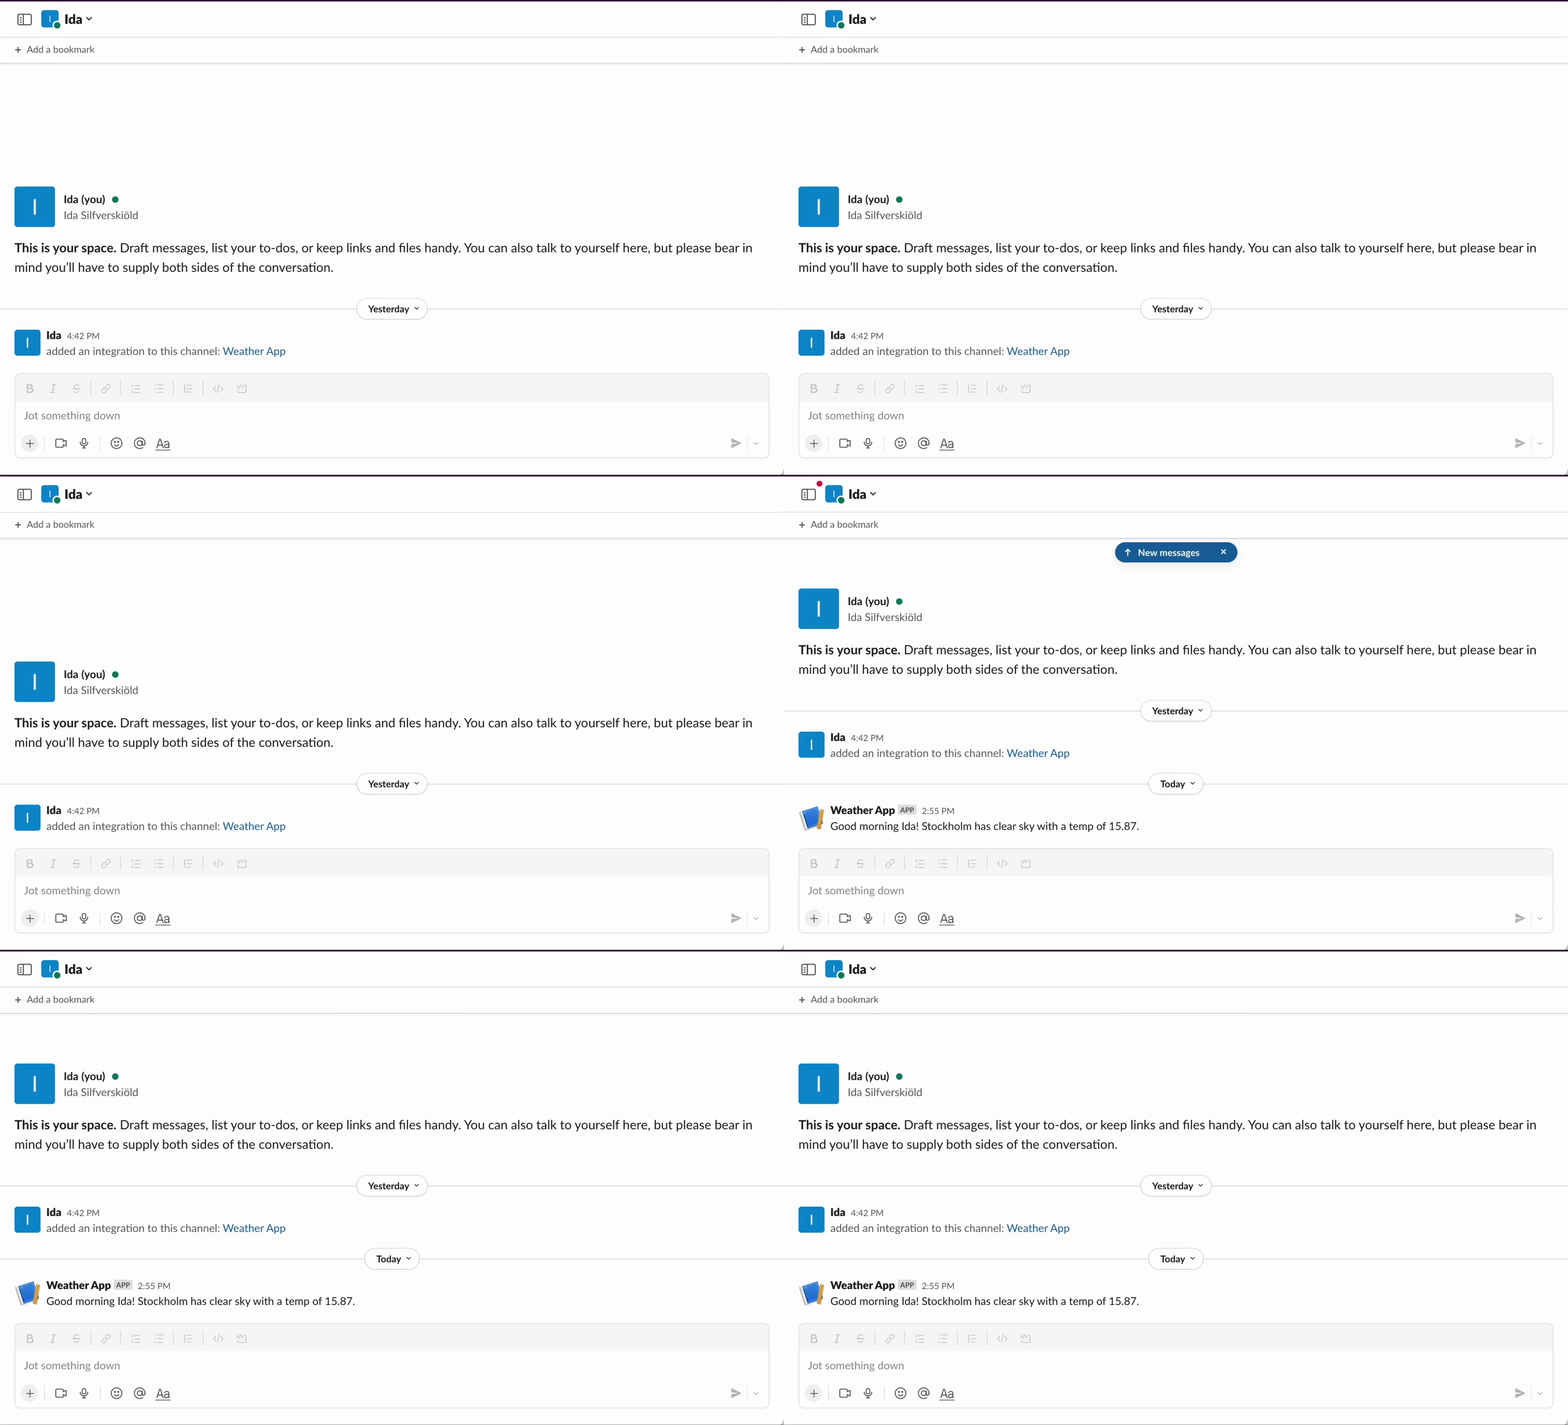
Remember to stop the app and then reset the cron schedule for a specific time so you don't have a message every minute in your Slack. I've set it up as '0 6 * * *' which I think is for 8 am in Stockholm.
Youtube Video Tutorial
If you want to see a full tutorial check the video below. I'm adding in inspirational-quotes for this one as well to spice things up.
Updated 3 months ago
